Address strip WS2812B: различия между версиями
| (не показаны 3 промежуточные версии 2 участников) | |||
| Строка 544: | Строка 544: | ||
</syntaxhighlight> | </syntaxhighlight> | ||
Теперь можно управлять runtime-переменными esp32 через | Теперь можно управлять runtime-переменными esp32 через Wiren Board. | ||
[[Файл:Снимок экрана 2023-12-07 095833.jpg]] | [[Файл:Снимок экрана 2023-12-07 095833.jpg]] | ||
| Строка 692: | Строка 692: | ||
После применения виртуального устройства можно управлять скорость обновления светодиодов из веб-интерфейса контроллера Wiren Board. | После применения виртуального устройства можно управлять скорость обновления светодиодов из веб-интерфейса контроллера Wiren Board. | ||
== | ==Паяем на плату== | ||
Понадобится: | |||
* макетная плата размером 40х60; | |||
* две винтовые клеммы на 2 и 3 контакта; | |||
* паяльник 40Вт с тонким жалом; | |||
* припой с флюсом. | |||
[[Image: Photo 2023-12-22 17-04-06.jpg |300px ]] | |||
Девборд в длину занимает почти всю плату - остаётся один ряд, поэтому решил клеммы разместить сбоку | |||
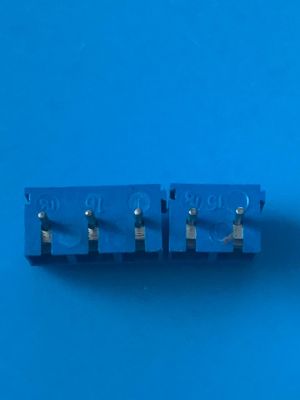
[[Image: Photo 2023-12-22 17-04-07.jpg |300px ]] | |||
Клеммы соединяем через пазы | |||
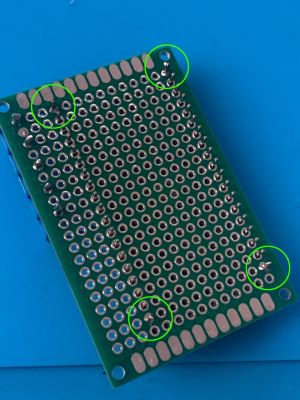
[[Image: Photo 2023-12-22 17-04-06 2.jpg |300px ]] | |||
Припаиваем к шахтам макетной платы все пять пинов от клемм, а также прихватываем крайние пины девборда. Есть важный нюанс - клеммы нужно расположить таким образом, чтобы было минимальное расстояние до нужных пинов девборда | |||
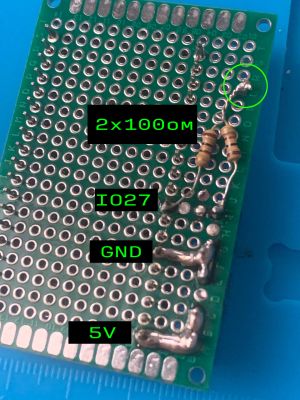
[[Image: Photo 2023-12-22 17-04-07 (2).jpg |300px ]] | |||
Клеммы расположены прямо напротив нужных пинов, поэтому нет необходимости соединять проводами, напаял шлейфы из олова, от IO27 до клеммы идут два последовательных резистора по 100ом (какие были), скрутку резисторов приаял к шахте, чтобы не болталось ничего. | |||
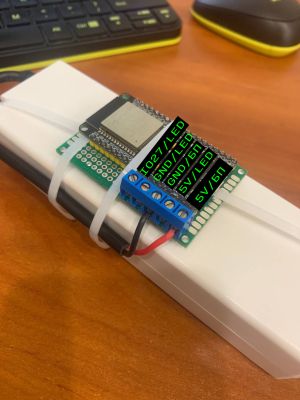
[[Image: Photo 2023-12-22 17-04-08.jpg |300px ]] | |||
Чтобы всё это упаковать, взял распаечную коробку небольшую, но в итоге совсем чуток не вместился туда, пришлось пока что на стяжках к корпусу блока питания закрепить, потом намучу какой-то подходящий корпус и переселю. | |||
[[Image: Photo 2023-12-22 17-04-34.jpg |300px ]] | |||
==Какие могут быть проблемы== | |||
# изначально лента тестировалась на arduino nano, и на LED_TYPE==WS2812B оно работало странно, но с учетом того что какие-то отдельные светодиоды загорались, я пришёл к выводу что цифра работает, но есть какие-то проблемы с частотой, в итоге заработало на WS2811_400, то есть на частоте 400кгц, однако, в случае с esp32 всё заработало со штатным типом WS2812B; | |||
# важно учитывать тот факт, что нельзя допускать подключения ленты без стабильного плюса, то есть в случае подключения ленты к GND и DIN-пину, есть риск, что пин спалится, чтобы подстраховаться - ставится резистор на 220ом, но всё равно лучше избегать таких вот нештатных ситуаций; | |||
# на самом деле проблемы могут быть самые разнообразные, потому что это DIY, если что пишите в чатике - попробуем разобраться. | |||
==Финальный код== | |||
Исходный код скетча и виртуального устройства на wb-rules смотрите в репозитори на ГитХабе [https://github.com/wirenboard/wb-community/tree/main/firmwares/ws2812b-to-wb ws2812b-to-wb] | |||
// | |||
/ | |||
// | |||
/ | |||
Текущая версия на 10:40, 25 декабря 2023
Описание
Статья создана членом сообщества и может не совпадать с позицией компании Wiren Board. Используйте приведённые инструкции на свой страх и риск.
Автор статьи: Paul Strong
В этой статье рассмотрим один из способов управления адресной лентой WS2812B из Wiren Board с использованием ESP32.
Здесь не будут рассмотрены характеристики железной части, этому уделено очень много внимания на просторах Интернет, тут будет сугубо техническая информация по процессу достижения цели, с небольшими лирическими отступлениями.
Что нам понадобится:
- любая отладочная плата, основанная на esp32;
- две bread board платы;
- соединительные проводки;
- лента ws2812b нужной длины (в моём случае бухта 5м с мощностью 14.4Вт/м);
- блок питания 5V соответствующей мощности (в моём случае 100W);
- резистор 220 ом;
- microUSB дата-кабель (обычный, от зарядки, может не подойти!);
- комп/ноут для сборки и заливки прошивки;
- VSCode + PlatformIO;
- контроллер Wirenboard с wb-rules v2.x;
- wi-fi сеть в диапазоне 2.4G.
Сборка физической схемы
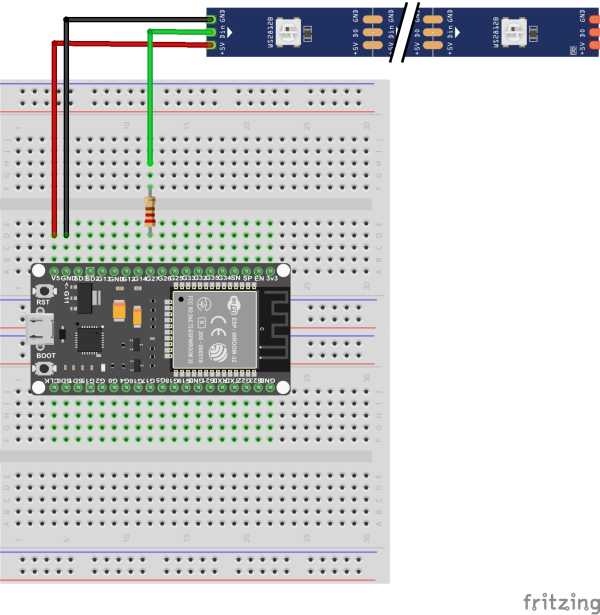
Для сборки нам нужно две bread board платы, собираем по схеме:
- пин 5V подключаем к +5V ленты
- пин GND
- пинг GPIO27 подключаем через резистор 220ом к DIN ленты
Обращаю внимание на то, что не рекомендуется тестировать конфигурацию более чем на 5 светодиодах, такого количества будет достаточно, чтобы понять как выглядит световая картинка в том или ином алгоритме.
Подключение большего количества светодиодов может привести к выгоранию USB-порта на компьютере, т.к. там обычно предельно допустимый ток 350мА, а один светодиод на такой ленте потребляет около 50мА.
Первый скетч
Заливаем первую прошивку.
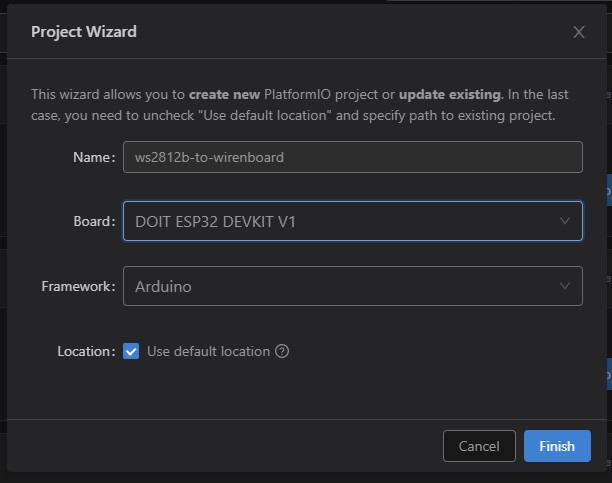
Подразумевается что на компьютере уже установлена среда разработки VSCode и расширение PlatformIO. Создадим новый проект.
Чтобы понимать, что esp32 работает, сделаем код, который постоянно зажигает и тушит встроенный светодиод синего цвета. Запускаем это дело в виде асинхронной функции.
Файл src/main.cpp:
#include <Arduino.h>
#define LED_PIN     2
int led_status = HIGH;

void ledUpdate(int v) {
  digitalWrite(LED_PIN, v);
}

void ledBlink( void * parameter ) {
  const TickType_t xDelay = 1000 / portTICK_PERIOD_MS;
  for(;;) {
    switch (led_status)
    {
    case HIGH:
      led_status = LOW;
      break;
    default:
      led_status = HIGH;
      break;
    }
    ledUpdate(led_status);
    vTaskDelay(xDelay);
    Serial.printf("blink %d\n", led_status);
  }
}

void setupLedBlink()  {
    pinMode(LED_PIN, OUTPUT);

    xTaskCreate(
                    ledBlink,          /* Task function. */
                    "ledBlink",        /* String with name of task. */
                    10000,            /* Stack size in bytes. */
                    NULL,             /* Parameter passed as input of the task */
                    1,                /* Priority of the task. */
                    NULL);            /* Task handle. */
}


void setup() {
    setupLedBlink();
}

void loop(){}
Сейчас можно залить попробовать скомпилировать прошивку, для этого в нижней панели жмём кнопку ![]()
Если всё собралось, только можно шить это дело в esp32:
- подключаем esp32 к компу при помощи microUSB data кабеля;
- инициируем заливку прошивки при помощи кнопки
 , когда система напишет «Connecting...» — зажимаем кнопку Boot на dev-плате esp32;
 - если прошивка залилась успешно, перезагружаем esp32 соответствующей кнопкой, после этого у вас должен замигать синий светодиод на плате.
Подключаемся к Wi-Fi
Приступаем к следующему этапу — нам нужно подключить нашу esp32 к wifi (чтобы далее подключиться к modbus tcp от wirenboard)
Добавим к нашему файлу main.cpp следующий код:
#include <Arduino.h>
#include <WiFi.h>

#define WIFI_SSID "ssid"
#define WIFI_PASSWORD "password"

void setupWifi() {
  WiFi.mode(WIFI_STA);
  WiFi.begin(WIFI_SSID, WIFI_PASSWORD);
  char emptyMsg[1] = "";
  char pointMsg[2] = ".";
  Serial.println(emptyMsg);


    // Wait for connection
  while (WiFi.status() != WL_CONNECTED) {
    delay(500);
    Serial.println(pointMsg);
  }
  Serial.println(emptyMsg);
  char connectedToMsg[14] = "Connected to ";
  Serial.println(connectedToMsg);
  Serial.println(WIFI_SSID);
  char ipAddrMsg[30];
  sprintf(ipAddrMsg, "IP address: %s", WiFi.localIP().toString().c_str());
  Serial.println(ipAddrMsg);
}
void setup() {
  setupWiFi();
}
а также модифицируем функцию setup:
void setup() {
  setupWifi();
}
Теперь после прошивки esp32 подключится к вашей wifi сети, IP-адрес можно будет посмотреть на роутере, либо в отладочных сообщения на Serial-порте, который связывает ваш комп с esp32, для этого нажмите кнопку ![]() на нижней панели.
на нижней панели.
Библиотека для работы с адресной лентой
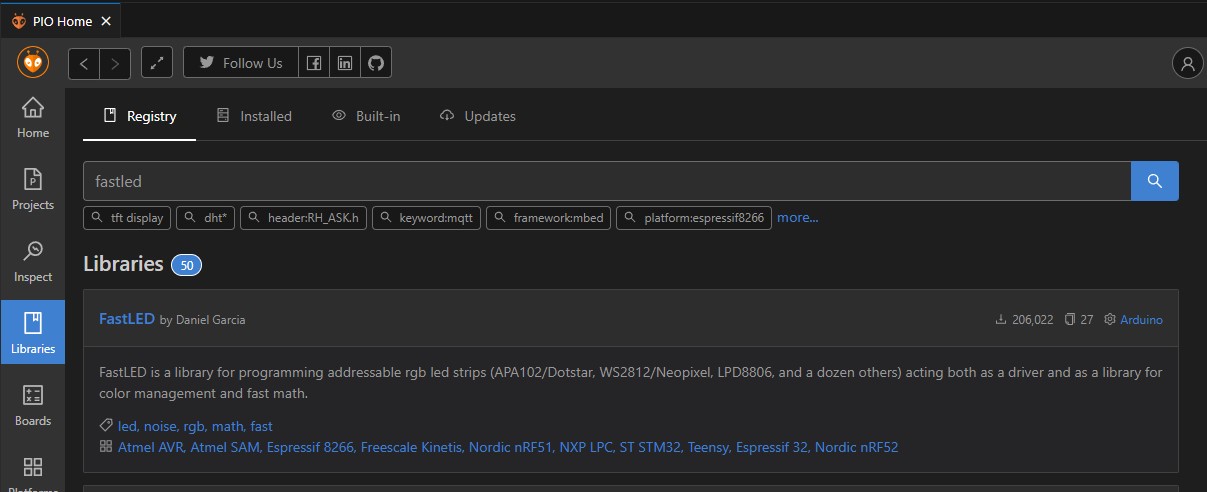
Далее нам нужно подключить к проекту библиотеку для работы с лентой, они есть разные, я использовал FastLED.
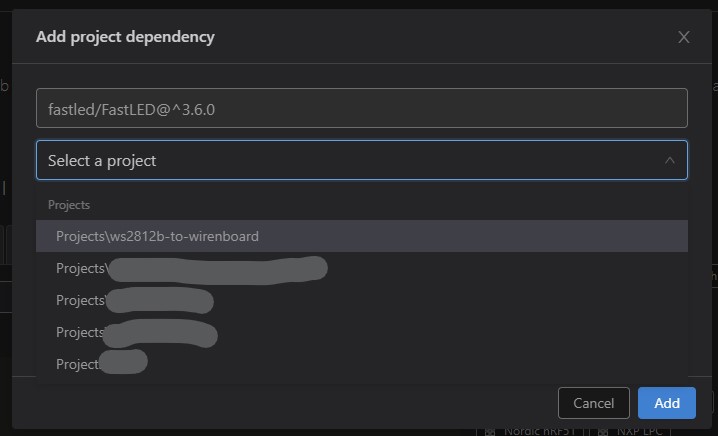
Добавляем в проект
Открываем src/main.cpp и приводим его к следующему виду:
#include <Arduino.h>
#include <FastLED.h>

#define DIN_PIN     27
#define NUM_LEDS    5
#define BRIGHTNESS  50
#define LED_TYPE    WS2812B
#define COLOR_ORDER GRB
CRGB leds[NUM_LEDS];

#define UPDATES_PER_SECOND 50

// This example shows several ways to set up and use 'palettes' of colors
// with FastLED.
//
// These compact palettes provide an easy way to re-colorize your
// animation on the fly, quickly, easily, and with low overhead.
//
// USING palettes is MUCH simpler in practice than in theory, so first just
// run this sketch, and watch the pretty lights as you then read through
// the code.  Although this sketch has eight (or more) different color schemes,
// the entire sketch compiles down to about 6.5K on AVR.
//
// FastLED provides a few pre-configured color palettes, and makes it
// extremely easy to make up your own color schemes with palettes.
//
// Some notes on the more abstract 'theory and practice' of
// FastLED compact palettes are at the bottom of this file.


CRGBPalette16 currentPalette;
TBlendType    currentBlending;

extern CRGBPalette16 myRedWhiteBluePalette;
extern const TProgmemPalette16 myRedWhiteBluePalette_p PROGMEM;


void setup() {
    delay( 3000 ); // power-up safety delay
    FastLED.addLeds<LED_TYPE, DIN_PIN, COLOR_ORDER>(leds, NUM_LEDS).setCorrection( TypicalLEDStrip );
    FastLED.setBrightness(  BRIGHTNESS );

    currentPalette = RainbowColors_p;
    currentBlending = LINEARBLEND;
}

 void ChangePalettePeriodically();
void FillLEDsFromPaletteColors( uint8_t colorIndex);

void loop()
{
    ChangePalettePeriodically();

    static uint8_t startIndex = 0;
    startIndex = startIndex + 1; /* motion speed */

    FillLEDsFromPaletteColors( startIndex);

    FastLED.show();
    FastLED.delay(1000 / UPDATES_PER_SECOND);
}

void FillLEDsFromPaletteColors( uint8_t colorIndex)
{
    uint8_t brightness = 255;

    for( int i = 0; i < NUM_LEDS; ++i) {
        leds[i] = ColorFromPalette( currentPalette, colorIndex, brightness, currentBlending);
        colorIndex += 3;
    }
}


// There are several different palettes of colors demonstrated here.
//
// FastLED provides several 'preset' palettes: RainbowColors_p, RainbowStripeColors_p,
// OceanColors_p, CloudColors_p, LavaColors_p, ForestColors_p, and PartyColors_p.
//
// Additionally, you can manually define your own color palettes, or you can write
// code that creates color palettes on the fly.  All are shown here.
 void SetupTotallyRandomPalette();
 void SetupPurpleAndGreenPalette();
 void SetupPurpleAndGreenPalette();
 void SetupBlackAndWhiteStripedPalette();

void ChangePalettePeriodically()
{
    uint8_t secondHand = (millis() / 1000) % 60;
    static uint8_t lastSecond = 99;

    if( lastSecond != secondHand) {
        lastSecond = secondHand;
        if( secondHand ==  0)  { currentPalette = RainbowColors_p;         currentBlending = LINEARBLEND; }
        if( secondHand == 10)  { currentPalette = RainbowStripeColors_p;   currentBlending = NOBLEND;  }
        if( secondHand == 15)  { currentPalette = RainbowStripeColors_p;   currentBlending = LINEARBLEND; }
        if( secondHand == 20)  { SetupPurpleAndGreenPalette();             currentBlending = LINEARBLEND; }
        if( secondHand == 25)  { SetupTotallyRandomPalette();              currentBlending = LINEARBLEND; }
        if( secondHand == 30)  { SetupBlackAndWhiteStripedPalette();       currentBlending = NOBLEND; }
        if( secondHand == 35)  { SetupBlackAndWhiteStripedPalette();       currentBlending = LINEARBLEND; }
        if( secondHand == 40)  { currentPalette = CloudColors_p;           currentBlending = LINEARBLEND; }
        if( secondHand == 45)  { currentPalette = PartyColors_p;           currentBlending = LINEARBLEND; }
        if( secondHand == 50)  { currentPalette = myRedWhiteBluePalette_p; currentBlending = NOBLEND;  }
        if( secondHand == 55)  { currentPalette = myRedWhiteBluePalette_p; currentBlending = LINEARBLEND; }
    }
}

// This function fills the palette with totally random colors.
void SetupTotallyRandomPalette()
{
    for( int i = 0; i < 16; ++i) {
        currentPalette[i] = CHSV( random8(), 255, random8());
    }
}

// This function sets up a palette of black and white stripes,
// using code.  Since the palette is effectively an array of
// sixteen CRGB colors, the various fill_* functions can be used
// to set them up.
void SetupBlackAndWhiteStripedPalette()
{
    // 'black out' all 16 palette entries...
    fill_solid( currentPalette, 16, CRGB::Black);
    // and set every fourth one to white.
    currentPalette[0] = CRGB::White;
    currentPalette[4] = CRGB::White;
    currentPalette[8] = CRGB::White;
    currentPalette[12] = CRGB::White;

}

// This function sets up a palette of purple and green stripes.
void SetupPurpleAndGreenPalette()
{
    CRGB purple = CHSV( HUE_PURPLE, 255, 255);
    CRGB green  = CHSV( HUE_GREEN, 255, 255);
    CRGB black  = CRGB::Black;

    currentPalette = CRGBPalette16(
                                   green,  green,  black,  black,
                                   purple, purple, black,  black,
                                   green,  green,  black,  black,
                                   purple, purple, black,  black );
}


// This example shows how to set up a static color palette
// which is stored in PROGMEM (flash), which is almost always more
// plentiful than RAM.  A static PROGMEM palette like this
// takes up 64 bytes of flash.
const TProgmemPalette16 myRedWhiteBluePalette_p PROGMEM =
{
    CRGB::Red,
    CRGB::Gray, // 'white' is too bright compared to red and blue
    CRGB::Blue,
    CRGB::Black,

    CRGB::Red,
    CRGB::Gray,
    CRGB::Blue,
    CRGB::Black,

    CRGB::Red,
    CRGB::Red,
    CRGB::Gray,
    CRGB::Gray,
    CRGB::Blue,
    CRGB::Blue,
    CRGB::Black,
    CRGB::Black
};


// Additional notes on FastLED compact palettes:
//
// Normally, in computer graphics, the palette (or "color lookup table")
// has 256 entries, each containing a specific 24-bit RGB color.  You can then
// index into the color palette using a simple 8-bit (one byte) value.
// A 256-entry color palette takes up 768 bytes of RAM, which on Arduino
// is quite possibly "too many" bytes.
//
// FastLED does offer traditional 256-element palettes, for setups that
// can afford the 768-byte cost in RAM.
//
// However, FastLED also offers a compact alternative.  FastLED offers
// palettes that store 16 distinct entries, but can be accessed AS IF
// they actually have 256 entries; this is accomplished by interpolating
// between the 16 explicit entries to create fifteen intermediate palette
// entries between each pair.
//
// So for example, if you set the first two explicit entries of a compact
// palette to Green (0,255,0) and Blue (0,0,255), and then retrieved
// the first sixteen entries from the virtual palette (of 256), you'd get
// Green, followed by a smooth gradient from green-to-blue, and then Blue.
Прошиваемся, в случае успеха у вас должна заработать лента, алгоритм будет менять каждые 5 секунд, всего 12 алгоритмов.
Подробно останавливаться на коде прошивки мы не будем, в Интернете полно разных алгоритмов, их можно добавлять к нашей оснастке, переключать их реже или чаще, можно даже кнопку прикрутить под это дело на один из пинов, тут кому насколько фантазии хватит.
Подключение к Modbus TCP
После настройки Wi-Fi мы можем подключаться к mqtt-брокеру контроллера Wiren Board, для этого нужно установить библиотеку, как мы это делали ранее, называется она PubSubClient.
Подключимся к брокеру, для этого добавим немного кода:
#include <Arduino.h>
#include <WiFi.h>
#include <PubSubClient.h>
#include <WiFiClient.h>

#define MODBUS_SERVER "192.168.0.10"
#define MODBUS_PORT 1883

WiFiClient wifiClient;
PubSubClient pubSubClient(wifiClient);

void modbusCallback(char* topic, byte* payload, unsigned int length) {
  Serial.print("Message arrived [");
  Serial.print(topic);
  Serial.print("] ");
  for (int i = 0; i < length; i++) {
    Serial.print((char)payload[i]);
  }
  Serial.println();

  // Switch on the LED if an 1 was received as first character
  if ((char)payload[0] == '1') {
    digitalWrite(BUILTIN_LED, LOW);   // Turn the LED on (Note that LOW is the voltage level
    // but actually the LED is on; this is because
    // it is active low on the ESP-01)
  } else {
    digitalWrite(BUILTIN_LED, HIGH);  // Turn the LED off by making the voltage HIGH
  }

}

void setupModbus() {
  pubSubClient.setServer(MODBUS_SERVER, MODBUS_PORT);
  pubSubClient.setCallback(modbusCallback);
}

void modbusReconnect() {
  // Loop until we're reconnected
  while (!pubSubClient.connected()) {
    Serial.print("Attempting MQTT connection...");
    // Create a random client ID
    String clientId = "ESP32Client-";
    clientId += String(random(0xffff), HEX);
    // Attempt to connect
    if (pubSubClient.connect(clientId.c_str())) {
      Serial.println("connected");
      pubSubClient.publish("outTopic", "hello world");
      pubSubClient.subscribe("inTopic");
    } else {
      Serial.print("failed, rc=");
      Serial.print(pubSubClient.state());
      Serial.println(" try again in 5 seconds");
      // Wait 5 seconds before retrying
      delay(5000);
    }
  }
}

void setup() {
  setupWifi();
  setupModbus();
}

void loop() {
  if (!pubSubClient.connected()) {
    modbusReconnect();
  }
  pubSubClient.loop();
}
Что мы здесь видим: мы можем создавать подписку на нужные топики либо сами публиковать какие то значения в нужные нам топики.
В нашем случае понадобится управлять настройками ленты, поэтому нам надо слушать некоторые топики, изменения которых будут влиять на поведение ленты, допустим, мы хотим управлять:
- яркостью
- выключать (яркость 0)
- включать (яркость 50%)
- останавливать и запускать автоматическую смену режима
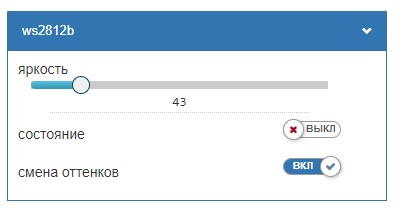
Виртуальное устройство в Wiren Board
Создадим на wb-rules виртуальное устройство нашей ленты в контроллере Wiren Board:
defineVirtualDevice("ws2812b", {
    title: "ws2812b",
    cells: {
      enabled: {
        title: "состояние",
        type: "switch",
        value: false,
      },
      brightness: {
        title: "яркость",
        type: "range",
        min: 0,
        max: 255,
        value: 50,
      },
	  hueLoop: {
        title: "смена оттенков",
        type: "switch",
        value: true,
	  }
	}
})


defineRule("ws2812b/enabled", {
  whenChanged: "ws2812b/enabled",
  then: function (newValue, devName, cellName) {
    if(newValue) {
      dev["ws2812b"]["brightness"] = 50
    } else {
      dev["ws2812b"]["brightness"] = 0
    }
  }
})
Теперь надо константу BRIGHTNESS переделать в переменную, ввести переменную hue_loop, а также подписаться на топики
#define BRIGHTNESS  50
uint8_t BRIGHTNESS = 50;
bool hueLoop = true;

void modbusCallback(char* topic, byte* payload, unsigned int length) {
  char payloadChar[sizeof(payload)];
  Serial.print("Message arrived [");
  Serial.print(topic);
  Serial.print("] ");
  for (int i = 0; i < length; i++) {
    Serial.print((char)payload[i]);
    payloadChar[i] = (char)payload[i];
  }
  Serial.println();

  String payloadStr = String(payloadChar);
  payloadStr.trim();

  if (strcmp(topic, "/devices/ws2812b/controls/brightness") == 0) {
    BRIGHTNESS = payloadStr.toInt();
    Serial.printf("brithness set to %d\n", BRIGHTNESS);
  }
  if (strcmp(topic, "/devices/ws2812b/controls/hueLoop") == 0) {
    if(payloadStr.toInt() == 1) {
      hueLoop = true;
    } else {
      hueLoop = false;
    }
  }
}

void ChangePalettePeriodically() {
   if(!hueLoop) {
       return;
   }
   ...
}

void modbusReconnect() {
  // Loop until we're reconnected
  while (!pubSubClient.connected()) {
    Serial.print("Attempting MQTT connection...");
    // Create a random client ID
    String clientId = "ESP32Client-";
    clientId += String(random(0xffff), HEX);
    // Attempt to connect
    if (pubSubClient.connect(clientId.c_str())) {
      Serial.println("connected");
      pubSubClient.subscribe("/devices/ws2812b/controls/brightness");
      pubSubClient.subscribe("/devices/ws2812b/controls/hueLoop");
    } else {
      Serial.print("failed, rc=");
      Serial.print(pubSubClient.state());
      Serial.println(" try again in 5 seconds");
      // Wait 5 seconds before retrying
      delay(5000);
    }
  }
}
Теперь можно управлять runtime-переменными esp32 через Wiren Board.
Загрузка прошивки по WiFi
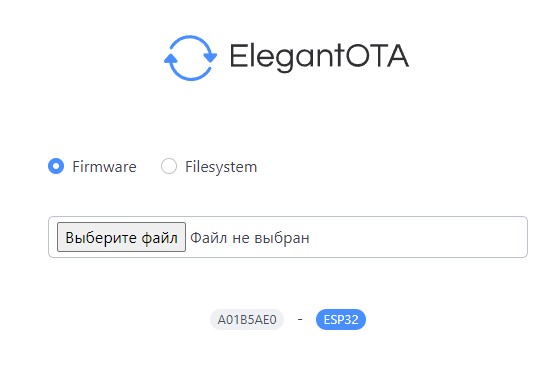
С учетом того что esp32 не всегда будет находиться рядом с компом, прошивать эту железка будет неудобно через кабель. Можно прикрутить возможность прошиваться через WiFi.
Установим модули
- AsyncElegantOTA
- ESPAsyncWebServer-esphome
Кодим функционал:
#include <Arduino.h>
#include <ESPAsyncWebServer.h>
#include <AsyncTCP.h>
#include <ESPAsyncWebServer.h>
#include <AsyncElegantOTA.h>

unsigned long ota_progress_millis = 0;
AsyncWebServer server(80);


void setupOTA(void) {
  server.on("/", HTTP_GET, [](AsyncWebServerRequest *request) {
    request->send(200, "text/plain", "Hi! This is a sample response.");
  });

  AsyncElegantOTA.begin(&server);    // Start AsyncElegantOTA
  server.begin();
  Serial.println("HTTP server started");
}
void setup() {
  setupOTA();
}
Теперь после запуска железки и получения ip-адреса будет доступен web-интерфейс (http://192.168.0.10/update), в котором можно выбрать прошивку и залить её по wi-fi, бонусом будет автоматический перезапуск железки после прошивки, то есть она сразу активируется.
Есть и минусы: если вы совершите ошибку в коде и будет возникал kernel panic / fatal, тогда вам уже точно придется тащить железку к компу и прошивать фикс через кабель
Добавление настроек
Допустим, мы захотели управлять какой-то настройкой еще, пускай это будет скорость обновления светодиодов. Ранее у нас была определена константа
#define UPDATES_PER_SECOND 500
Теперь нам её придётся сделать обычной переменной:
int UPDATES_PER_SECOND = 500;
Теперь нужно подписать на новый топик:
void modbusCallback(char* topic, byte* payload, unsigned int length) {
  char payloadChar[sizeof(payload)];
  Serial.print("Message arrived [");
  Serial.print(topic);
  Serial.print("] ");
  for (int i = 0; i < length; i++) {
    Serial.print((char)payload[i]);
    payloadChar[i] = (char)payload[i];
  }
  Serial.println();

  String payloadStr = String(payloadChar);
  payloadStr.trim();

  if (strcmp(topic, "/devices/ws2812b/controls/brightness") == 0) {
    BRIGHTNESS = payloadStr.toInt();
    Serial.printf("brithness set to %d\n", BRIGHTNESS);
  }
  if (strcmp(topic, "/devices/ws2812b/controls/hueLoop") == 0) {
    if(payloadStr.toInt() == 1) {
      hueLoop = true;
    } else {
      hueLoop = false;
    }
  }
  if (strcmp(topic, "/devices/ws2812b/controls/updatesPerSecond") == 0) {
      UPDATES_PER_SECOND = payloadStr.toInt();
  }
}

void modbusReconnect() {
  // Loop until we're reconnected
  while (!pubSubClient.connected()) {
    Serial.print("Attempting MQTT connection...");
    // Create a random client ID
    String clientId = "ESP32Client-";
    clientId += String(random(0xffff), HEX);
    // Attempt to connect
    if (pubSubClient.connect(clientId.c_str())) {
      Serial.println("connected");
      pubSubClient.subscribe("/devices/ws2812b/controls/brightness");
      pubSubClient.subscribe("/devices/ws2812b/controls/hueLoop");
      pubSubClient.subscribe("/devices/ws2812b/controls/updatesPerSecond");
    } else {
      Serial.print("failed, rc=");
      Serial.print(pubSubClient.state());
      Serial.println(" try again in 5 seconds");
      // Wait 5 seconds before retrying
      delay(5000);
    }
  }
}
Заливаем прошивку в esp32.
Осталось обновить виртуальное устройство в контроллере Wiren Board:
defineVirtualDevice("ws2812b", {
    title: "ws2812b",
    cells: {
      enabled: {
        title: "состояние",
        type: "switch",
        value: false,
      },
      brightness: {
        title: "яркость",
        type: "range",
        min: 0,
        max: 255,
        value: 50,
      },
	  hueLoop: {
        title: "смена оттенков",
        type: "switch",
        value: true,
	  },
      updatesPerSecond: {
        title: "скорость обновления светодиодов",
        type: "range",
        min: 10,
        max: 1000,
        value: 100,
      },
	}
})
После применения виртуального устройства можно управлять скорость обновления светодиодов из веб-интерфейса контроллера Wiren Board.
Паяем на плату
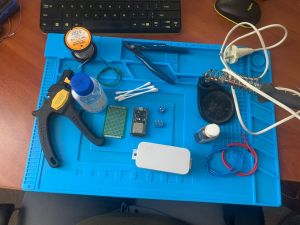
Понадобится:
- макетная плата размером 40х60;
- две винтовые клеммы на 2 и 3 контакта;
- паяльник 40Вт с тонким жалом;
- припой с флюсом.
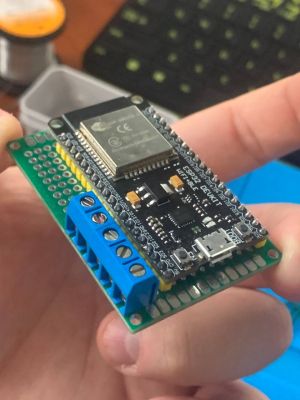
Девборд в длину занимает почти всю плату - остаётся один ряд, поэтому решил клеммы разместить сбоку
Клеммы соединяем через пазы
Припаиваем к шахтам макетной платы все пять пинов от клемм, а также прихватываем крайние пины девборда. Есть важный нюанс - клеммы нужно расположить таким образом, чтобы было минимальное расстояние до нужных пинов девборда
Клеммы расположены прямо напротив нужных пинов, поэтому нет необходимости соединять проводами, напаял шлейфы из олова, от IO27 до клеммы идут два последовательных резистора по 100ом (какие были), скрутку резисторов приаял к шахте, чтобы не болталось ничего.
Чтобы всё это упаковать, взял распаечную коробку небольшую, но в итоге совсем чуток не вместился туда, пришлось пока что на стяжках к корпусу блока питания закрепить, потом намучу какой-то подходящий корпус и переселю.
Какие могут быть проблемы
- изначально лента тестировалась на arduino nano, и на LED_TYPE==WS2812B оно работало странно, но с учетом того что какие-то отдельные светодиоды загорались, я пришёл к выводу что цифра работает, но есть какие-то проблемы с частотой, в итоге заработало на WS2811_400, то есть на частоте 400кгц, однако, в случае с esp32 всё заработало со штатным типом WS2812B;
- важно учитывать тот факт, что нельзя допускать подключения ленты без стабильного плюса, то есть в случае подключения ленты к GND и DIN-пину, есть риск, что пин спалится, чтобы подстраховаться - ставится резистор на 220ом, но всё равно лучше избегать таких вот нештатных ситуаций;
- на самом деле проблемы могут быть самые разнообразные, потому что это DIY, если что пишите в чатике - попробуем разобраться.
Финальный код
Исходный код скетча и виртуального устройства на wb-rules смотрите в репозитори на ГитХабе ws2812b-to-wb
