Address strip WS2812B: различия между версиями
| Строка 572: | Строка 572: | ||
==Финальный код скетча== | ==Финальный код скетча== | ||
#include <Arduino.h> | #include <Arduino.h> | ||
#include <FastLED.h> | #include <FastLED.h> | ||
| Строка 582: | Строка 581: | ||
#include <ESPAsyncWebServer.h> | #include <ESPAsyncWebServer.h> | ||
#include <AsyncElegantOTA.h> | #include <AsyncElegantOTA.h> | ||
| Строка 605: | Строка 594: | ||
server.begin(); | server.begin(); | ||
Serial.println("HTTP server started"); | Serial.println("HTTP server started"); | ||
} | |||
#define WIFI_SSID "ssid" | |||
#define WIFI_PASSWORD "xxx" | |||
void setupWifi() { | |||
WiFi.mode(WIFI_STA); | |||
WiFi.begin(WIFI_SSID, WIFI_PASSWORD); | |||
char emptyMsg[1] = ""; | |||
char pointMsg[2] = "."; | |||
Serial.println(emptyMsg); | |||
// Wait for connection | |||
while (WiFi.status() != WL_CONNECTED) { | |||
delay(500); | |||
Serial.println(pointMsg); | |||
} | |||
Serial.println(emptyMsg); | |||
char connectedToMsg[14] = "Connected to "; | |||
Serial.println(connectedToMsg); | |||
Serial.println(WIFI_SSID); | |||
char ipAddrMsg[30]; | |||
sprintf(ipAddrMsg, "IP address: %s", WiFi.localIP().toString().c_str()); | |||
Serial.println(ipAddrMsg); | |||
} | } | ||
| Строка 625: | Строка 637: | ||
// Some notes on the more abstract 'theory and practice' of | // Some notes on the more abstract 'theory and practice' of | ||
// FastLED compact palettes are at the bottom of this file. | // FastLED compact palettes are at the bottom of this file. | ||
#define DIN_PIN 27 | |||
#define NUM_LEDS 5 | |||
#define LED_TYPE WS2811_400 | |||
#define COLOR_ORDER GRB | |||
CRGB leds[NUM_LEDS]; | |||
#define UPDATES_PER_SECOND 50 | |||
uint8_t BRIGHTNESS = 50; | |||
bool hueLoop = true; | |||
CRGBPalette16 currentPalette; | CRGBPalette16 currentPalette; | ||
TBlendType currentBlending; | TBlendType currentBlending; | ||
| Строка 634: | Строка 656: | ||
extern const TProgmemPalette16 myRedWhiteBluePalette_p PROGMEM; | extern const TProgmemPalette16 myRedWhiteBluePalette_p PROGMEM; | ||
void setupFastLED(){ | void setupFastLED(){ | ||
delay( 3000 ); // power-up safety delay | delay( 3000 ); // power-up safety delay | ||
FastLED.addLeds<LED_TYPE, | FastLED.addLeds<LED_TYPE, DIN_PIN, COLOR_ORDER>(leds, NUM_LEDS).setCorrection( TypicalLEDStrip ); | ||
FastLED.setBrightness( BRIGHTNESS ); | FastLED.setBrightness( BRIGHTNESS ); | ||
| Строка 667: | Строка 666: | ||
#define MODBUS_SERVER " | #define MODBUS_SERVER "10.50.0.253" | ||
#define MODBUS_PORT 1883 | #define MODBUS_PORT 1883 | ||
WiFiClient wifiClient; | WiFiClient wifiClient; | ||
| Строка 732: | Строка 731: | ||
} | } | ||
void ChangePalettePeriodically(); | void ChangePalettePeriodically(); | ||
void FillLEDsFromPaletteColors( uint8_t colorIndex); | void FillLEDsFromPaletteColors( uint8_t colorIndex); | ||
void FillLEDsFromPaletteColors( uint8_t colorIndex) | void FillLEDsFromPaletteColors( uint8_t colorIndex) | ||
| Строка 891: | Строка 868: | ||
// Green, followed by a smooth gradient from green-to-blue, and then Blue. | // Green, followed by a smooth gradient from green-to-blue, and then Blue. | ||
#define LED_PIN 2 | |||
int led_status = HIGH; | |||
void ledUpdate(int v) { | |||
digitalWrite(LED_PIN, v); | |||
} | |||
void ledBlink( void * parameter ) { | |||
const TickType_t xDelay = 1000 / portTICK_PERIOD_MS; | |||
for(;;) { | |||
switch (led_status) | |||
{ | |||
case HIGH: | |||
led_status = LOW; | |||
break; | |||
default: | |||
led_status = HIGH; | |||
break; | |||
} | |||
ledUpdate(led_status); | |||
vTaskDelay(xDelay); | |||
Serial.printf("blink %d\n", led_status); | |||
} | |||
} | |||
void setupLedBlink() { | |||
pinMode(LED_PIN, OUTPUT); | |||
xTaskCreate( | |||
ledBlink, /* Task function. */ | |||
"ledBlink", /* String with name of task. */ | |||
10000, /* Stack size in bytes. */ | |||
NULL, /* Parameter passed as input of the task */ | |||
1, /* Priority of the task. */ | |||
NULL); /* Task handle. */ | |||
} | |||
void setup() { | |||
Serial.begin(9600); | |||
setupLedBlink(); | |||
setupWifi(); | |||
setupFastLED(); | |||
setupModbus(); | |||
setupOTA(); | |||
} | |||
void loop() | |||
{ | |||
modbusLoop(); | |||
if(!hueLoop) { | |||
return; | |||
} | |||
ChangePalettePeriodically(); | |||
static uint8_t startIndex = 0; | |||
startIndex = startIndex + 1; /* motion speed */ | |||
FillLEDsFromPaletteColors( startIndex); | |||
FastLED.show(); | |||
FastLED.delay(1000 / UPDATES_PER_SECOND); | |||
} | |||
</syntaxhighlight> | </syntaxhighlight> | ||
Версия 11:08, 7 декабря 2023
СТАТЬЯ НАХОДИТСЯ В СТАДИИ РАЗРАБОТКИ
Управление адресной лентой WS2812B из Wirenboard
здесь будет рассмотрен один из способов управления адресной лентой WS2812B из Wirenboard с использованием ESP32.
здесь не будут рассмотрены характеристики железной части, этому уделено очень много внимания на просторах Интернет, тут будет сугубо техническая информация по процессу достижения цели, с небольшими лирическими отступлениями.
Что нам понадобится
- любая отладочная плата, основанная на esp32
- две bread board платы
- соединительные проводки
- лента ws2812b нужной длины (в моём случае бухта 5м с мощностью 14.4Вт/м)
- блок питания 5V соответствующей мощности (в моём случае 100W)
- резистор 220 ом
- microUSB дата-кабель (обычный, от зарядки, может не подойти!)
- комп/ноут для сборки и заливки прошивки
- VSCode + PlatformIO
- контроллер Wirenboard с wb-rules v2.x
- wi-fi сеть в диапазоне 2.4G
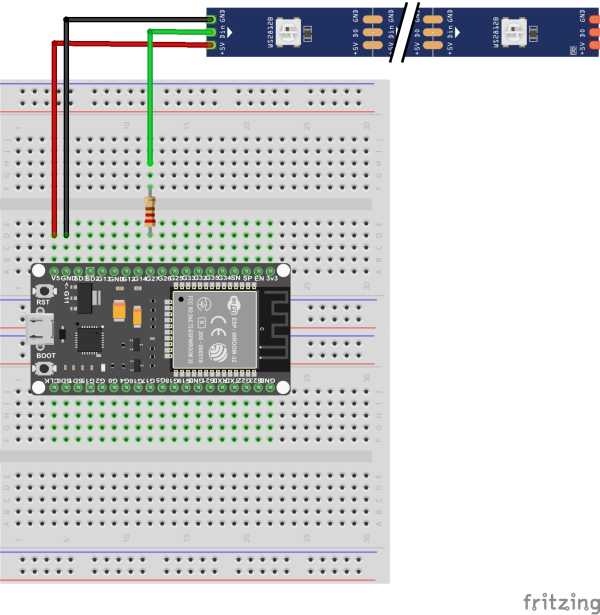
Сборка физической схемы
Для сборки нам нужно две bread board платы, собираем по схеме:
- пин 5V подключаем к +5V ленты
- пин GND
- пинг GPIO27 подключаем через резистор 220ом к DIN ленты
Обращаю внимание на то, что не рекомендуется тестировать конфигурацию более чем на 5 светодиодах, такого количества будет достаточно, чтобы понять как выглядит световая картинка в том или ином алгоритме. Подключение большего количества светодиодов может привести к выгоранию USB-порта на компе, т.к. там обычно предельно допустимый ток 350мА, а один светодиод на такой ленте потребляет около 50мА.
Первый скетч
Заливаем первую прошивку.
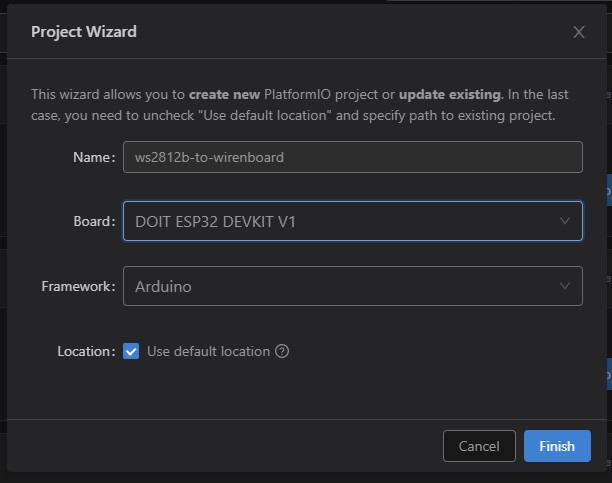
Подразумевается что на PC уже установлена среда разработки VSCode и расширение PlatformIO. Создадим новый проект.
закодим src/main.cpp, чтобы понимать, что esp32 работает, сделаем код, который постоянно зажигает и тушит встроенный светодиод синего цвета.
запускаем это дело в виде асинхронной функции.
#include <Arduino.h>
#define LED_PIN     2
int led_status = HIGH;

void ledUpdate(int v) {
  digitalWrite(LED_PIN, v);
}

void ledBlink( void * parameter ) {
  const TickType_t xDelay = 1000 / portTICK_PERIOD_MS;
  for(;;) {
    switch (led_status)
    {
    case HIGH:
      led_status = LOW;
      break;
    default:
      led_status = HIGH;
      break;
    }
    ledUpdate(led_status);
    vTaskDelay(xDelay);
    Serial.printf("blink %d\n", led_status);
  }
}

void setupLedBlink()  {
    pinMode(LED_PIN, OUTPUT);

    xTaskCreate(
                    ledBlink,          /* Task function. */
                    "ledBlink",        /* String with name of task. */
                    10000,            /* Stack size in bytes. */
                    NULL,             /* Parameter passed as input of the task */
                    1,                /* Priority of the task. */
                    NULL);            /* Task handle. */
}


void setup() {
    setupLedBlink();
}

void loop(){}
сейчас можно залить попробовать скомпилировать прошивку, для этого в нижней панели жмём кнопку ![]()
если всё собралось, только можно шить это дело в esp32:
- подключаем esp32 к компу при помощи microUSB data кабеля
- инициируем заливку прошивки при помощи кнопки
 , когда система напишет "Connecting..." - зажимаем кнопку Boot на dev-плате esp32
 - если прошивка залилась успешно, перезагружаем esp32 соответствующей кнопкой, после этого у вас должен замигать синий светодиод на плате
Подключаемся к wifi
Приступаем к следующему этапу - нам нужно подключить нашу esp32 к wifi (чтобы далее подключиться к modbus tcp от wirenboard)
добавим к нашему файлу main.cpp следующий код:
#include <Arduino.h>
#include <WiFi.h>

#define WIFI_SSID "ssid"
#define WIFI_PASSWORD "password"

void setupWifi() {
  WiFi.mode(WIFI_STA);
  WiFi.begin(WIFI_SSID, WIFI_PASSWORD);
  char emptyMsg[1] = "";
  char pointMsg[2] = ".";
  Serial.println(emptyMsg);


    // Wait for connection
  while (WiFi.status() != WL_CONNECTED) {
    delay(500);
    Serial.println(pointMsg);
  }
  Serial.println(emptyMsg);
  char connectedToMsg[14] = "Connected to ";
  Serial.println(connectedToMsg);
  Serial.println(WIFI_SSID);
  char ipAddrMsg[30];
  sprintf(ipAddrMsg, "IP address: %s", WiFi.localIP().toString().c_str());
  Serial.println(ipAddrMsg);
}
void setup() {
  setupWiFi();
}
а также модифицируем функцию setup:
void setup() {
  setupWifi();
}
теперь после прошивки esp32 подключится к вашей wifi сети, IP-адрес можно будет посмотреть на роутере, либо в отладочных сообщения на Serial-порте, который связывает ваш комп с esp32, для этого нажмите кнопку ![]() на нижней панели
на нижней панели
Библиотека для работы с адресной лентой
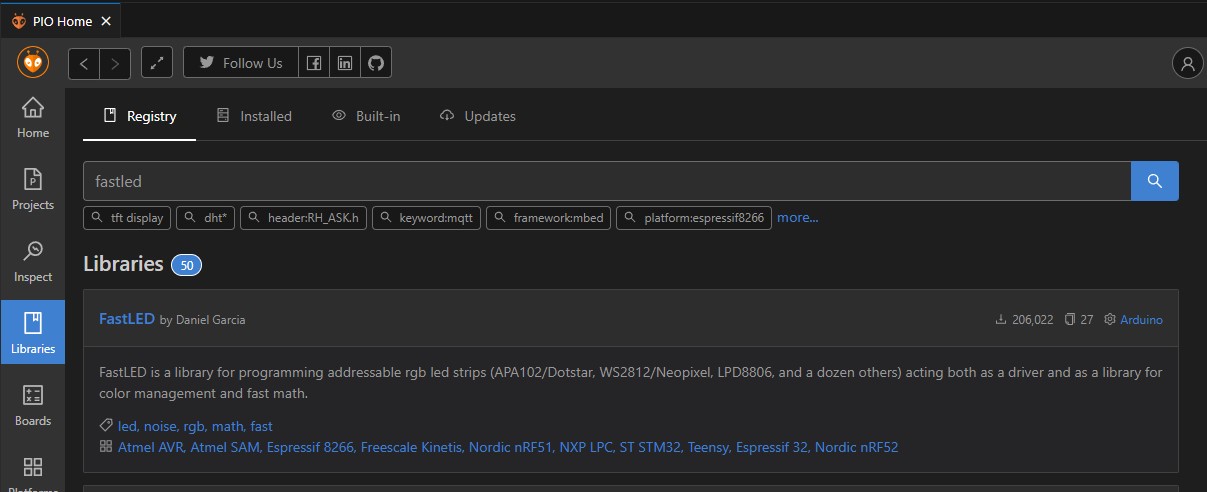
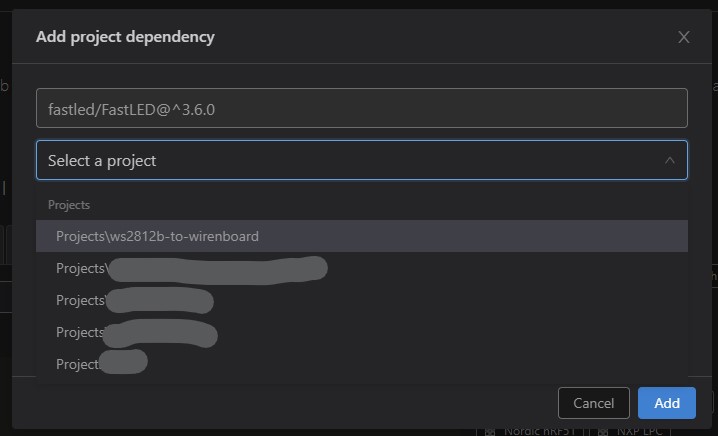
Далее нам нужно подключить к проекту библиотеку для работы с лентой, они есть разные, я использовал FastLED
добавляем в проект
Открываем src/main.cpp и приводим его к следующему виду:
#include <Arduino.h>
#include <FastLED.h>

#define DIN_PIN     27
#define NUM_LEDS    5
#define BRIGHTNESS  50
#define LED_TYPE    WS2811_400
#define COLOR_ORDER GRB
CRGB leds[NUM_LEDS];

#define UPDATES_PER_SECOND 50

// This example shows several ways to set up and use 'palettes' of colors
// with FastLED.
//
// These compact palettes provide an easy way to re-colorize your
// animation on the fly, quickly, easily, and with low overhead.
//
// USING palettes is MUCH simpler in practice than in theory, so first just
// run this sketch, and watch the pretty lights as you then read through
// the code.  Although this sketch has eight (or more) different color schemes,
// the entire sketch compiles down to about 6.5K on AVR.
//
// FastLED provides a few pre-configured color palettes, and makes it
// extremely easy to make up your own color schemes with palettes.
//
// Some notes on the more abstract 'theory and practice' of
// FastLED compact palettes are at the bottom of this file.


CRGBPalette16 currentPalette;
TBlendType    currentBlending;

extern CRGBPalette16 myRedWhiteBluePalette;
extern const TProgmemPalette16 myRedWhiteBluePalette_p PROGMEM;


void setup() {
    delay( 3000 ); // power-up safety delay
    FastLED.addLeds<LED_TYPE, DIN_PIN, COLOR_ORDER>(leds, NUM_LEDS).setCorrection( TypicalLEDStrip );
    FastLED.setBrightness(  BRIGHTNESS );

    currentPalette = RainbowColors_p;
    currentBlending = LINEARBLEND;
}

 void ChangePalettePeriodically();
void FillLEDsFromPaletteColors( uint8_t colorIndex);

void loop()
{
    ChangePalettePeriodically();

    static uint8_t startIndex = 0;
    startIndex = startIndex + 1; /* motion speed */

    FillLEDsFromPaletteColors( startIndex);

    FastLED.show();
    FastLED.delay(1000 / UPDATES_PER_SECOND);
}

void FillLEDsFromPaletteColors( uint8_t colorIndex)
{
    uint8_t brightness = 255;

    for( int i = 0; i < NUM_LEDS; ++i) {
        leds[i] = ColorFromPalette( currentPalette, colorIndex, brightness, currentBlending);
        colorIndex += 3;
    }
}


// There are several different palettes of colors demonstrated here.
//
// FastLED provides several 'preset' palettes: RainbowColors_p, RainbowStripeColors_p,
// OceanColors_p, CloudColors_p, LavaColors_p, ForestColors_p, and PartyColors_p.
//
// Additionally, you can manually define your own color palettes, or you can write
// code that creates color palettes on the fly.  All are shown here.
 void SetupTotallyRandomPalette();
 void SetupPurpleAndGreenPalette();
 void SetupPurpleAndGreenPalette();
 void SetupBlackAndWhiteStripedPalette();

void ChangePalettePeriodically()
{
    uint8_t secondHand = (millis() / 1000) % 60;
    static uint8_t lastSecond = 99;

    if( lastSecond != secondHand) {
        lastSecond = secondHand;
        if( secondHand ==  0)  { currentPalette = RainbowColors_p;         currentBlending = LINEARBLEND; }
        if( secondHand == 10)  { currentPalette = RainbowStripeColors_p;   currentBlending = NOBLEND;  }
        if( secondHand == 15)  { currentPalette = RainbowStripeColors_p;   currentBlending = LINEARBLEND; }
        if( secondHand == 20)  { SetupPurpleAndGreenPalette();             currentBlending = LINEARBLEND; }
        if( secondHand == 25)  { SetupTotallyRandomPalette();              currentBlending = LINEARBLEND; }
        if( secondHand == 30)  { SetupBlackAndWhiteStripedPalette();       currentBlending = NOBLEND; }
        if( secondHand == 35)  { SetupBlackAndWhiteStripedPalette();       currentBlending = LINEARBLEND; }
        if( secondHand == 40)  { currentPalette = CloudColors_p;           currentBlending = LINEARBLEND; }
        if( secondHand == 45)  { currentPalette = PartyColors_p;           currentBlending = LINEARBLEND; }
        if( secondHand == 50)  { currentPalette = myRedWhiteBluePalette_p; currentBlending = NOBLEND;  }
        if( secondHand == 55)  { currentPalette = myRedWhiteBluePalette_p; currentBlending = LINEARBLEND; }
    }
}

// This function fills the palette with totally random colors.
void SetupTotallyRandomPalette()
{
    for( int i = 0; i < 16; ++i) {
        currentPalette[i] = CHSV( random8(), 255, random8());
    }
}

// This function sets up a palette of black and white stripes,
// using code.  Since the palette is effectively an array of
// sixteen CRGB colors, the various fill_* functions can be used
// to set them up.
void SetupBlackAndWhiteStripedPalette()
{
    // 'black out' all 16 palette entries...
    fill_solid( currentPalette, 16, CRGB::Black);
    // and set every fourth one to white.
    currentPalette[0] = CRGB::White;
    currentPalette[4] = CRGB::White;
    currentPalette[8] = CRGB::White;
    currentPalette[12] = CRGB::White;

}

// This function sets up a palette of purple and green stripes.
void SetupPurpleAndGreenPalette()
{
    CRGB purple = CHSV( HUE_PURPLE, 255, 255);
    CRGB green  = CHSV( HUE_GREEN, 255, 255);
    CRGB black  = CRGB::Black;

    currentPalette = CRGBPalette16(
                                   green,  green,  black,  black,
                                   purple, purple, black,  black,
                                   green,  green,  black,  black,
                                   purple, purple, black,  black );
}


// This example shows how to set up a static color palette
// which is stored in PROGMEM (flash), which is almost always more
// plentiful than RAM.  A static PROGMEM palette like this
// takes up 64 bytes of flash.
const TProgmemPalette16 myRedWhiteBluePalette_p PROGMEM =
{
    CRGB::Red,
    CRGB::Gray, // 'white' is too bright compared to red and blue
    CRGB::Blue,
    CRGB::Black,

    CRGB::Red,
    CRGB::Gray,
    CRGB::Blue,
    CRGB::Black,

    CRGB::Red,
    CRGB::Red,
    CRGB::Gray,
    CRGB::Gray,
    CRGB::Blue,
    CRGB::Blue,
    CRGB::Black,
    CRGB::Black
};


// Additional notes on FastLED compact palettes:
//
// Normally, in computer graphics, the palette (or "color lookup table")
// has 256 entries, each containing a specific 24-bit RGB color.  You can then
// index into the color palette using a simple 8-bit (one byte) value.
// A 256-entry color palette takes up 768 bytes of RAM, which on Arduino
// is quite possibly "too many" bytes.
//
// FastLED does offer traditional 256-element palettes, for setups that
// can afford the 768-byte cost in RAM.
//
// However, FastLED also offers a compact alternative.  FastLED offers
// palettes that store 16 distinct entries, but can be accessed AS IF
// they actually have 256 entries; this is accomplished by interpolating
// between the 16 explicit entries to create fifteen intermediate palette
// entries between each pair.
//
// So for example, if you set the first two explicit entries of a compact
// palette to Green (0,255,0) and Blue (0,0,255), and then retrieved
// the first sixteen entries from the virtual palette (of 256), you'd get
// Green, followed by a smooth gradient from green-to-blue, and then Blue.
прошиваемся, в случае успеха у вас должна заработать лента, алгоритм будет менять каждые 5 секунд, всего 12 алгоритмов
Подробно останавливаться на коде прошивки мы не будем, в Интернете полно разных алгоритмов, их можно добавлять к нашей оснастке, переключать их реже или чаще, можно даже кнопку прикрутить под это дело на один из пинов, тут кому насколько фантазии хватит.
Подключение к Modbus TCP
После настройки wifi мы можем подключаться к mqtt-брокеру wirenboard, для этого нужно установить библиотеку, как мы это делали ранее, называется она PubSubClient
подключимся к брокеру, для этого добавим немного кода:
#include <Arduino.h>
#include <WiFi.h>
#include <PubSubClient.h>
#include <WiFiClient.h>

#define MODBUS_SERVER "192.168.0.10"
#define MODBUS_PORT 1883

WiFiClient wifiClient;
PubSubClient pubSubClient(wifiClient);

void modbusCallback(char* topic, byte* payload, unsigned int length) {
  Serial.print("Message arrived [");
  Serial.print(topic);
  Serial.print("] ");
  for (int i = 0; i < length; i++) {
    Serial.print((char)payload[i]);
  }
  Serial.println();

  // Switch on the LED if an 1 was received as first character
  if ((char)payload[0] == '1') {
    digitalWrite(BUILTIN_LED, LOW);   // Turn the LED on (Note that LOW is the voltage level
    // but actually the LED is on; this is because
    // it is active low on the ESP-01)
  } else {
    digitalWrite(BUILTIN_LED, HIGH);  // Turn the LED off by making the voltage HIGH
  }

}

void setupModbus() {
  pubSubClient.setServer(MODBUS_SERVER, MODBUS_PORT);
  pubSubClient.setCallback(modbusCallback);
  pubSubClient.publish("outTopic", "hello world");
  pubSubClient.subscribe("inTopic");
}

void modbusReconnect() {
  // Loop until we're reconnected
  while (!pubSubClient.connected()) {
    Serial.print("Attempting MQTT connection...");
    // Create a random client ID
    String clientId = "ESP32Client-";
    clientId += String(random(0xffff), HEX);
    // Attempt to connect
    if (pubSubClient.connect(clientId.c_str())) {
      Serial.println("connected");
    } else {
      Serial.print("failed, rc=");
      Serial.print(pubSubClient.state());
      Serial.println(" try again in 5 seconds");
      // Wait 5 seconds before retrying
      delay(5000);
    }
  }
}

void setup() {
  setupWifi();
  setupModbus();
}

void loop() {
  if (!pubSubClient.connected()) {
    modbusReconnect();
  }
  pubSubClient.loop();
}
что мы здесь видим: мы можем создавать подписку на нужные топики либо сами публиковать какие то значения в нужные нам топики.
в нашем случае понадобится управлять настройками ленты, поэтому нам надо слушать некоторые топики, изменения которых будут влиять на поведение ленты, допустим, мы хотим управлять: - яркостью - выключать (яркость 0) - включать (яркость 50%) - останавливать и запускать автоматическую смену режима
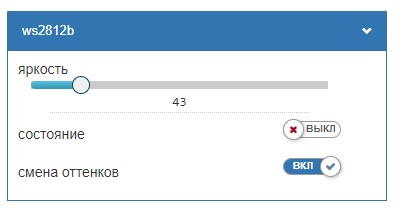
Виртуальное устройство в Wirenboard
Создадим виртуальное устройство нашей ленты в wirenboard:
defineVirtualDevice("ws2812b", {
    title: "ws2812b",
    cells: {
      enabled: {
        title: "состояние",
        type: "switch",
        value: false,
      },
      brightness: {
        title: "яркость",
        type: "range",
        min: 0,
        max: 255,
        value: 50,
      },
	  hueLoop: {
        title: "смена оттенков",
        type: "switch",
        value: true,
	  }
	}
})


defineRule("ws2812b/enabled", {
  whenChanged: "ws2812b/enabled",
  then: function (newValue, devName, cellName) {
    if(newValue) {
      dev["ws2812b"]["brightness"] = 50
    } else {
      dev["ws2812b"]["brightness"] = 0
    }
  }
})
подписываем на топики:
void setupModbus() {
  pubSubClient.setServer(MODBUS_SERVER, MODBUS_PORT);
  pubSubClient.setCallback(modbusCallback);
  pubSubClient.subscribe("/devices/ws2812b/controls/brightness");
  pubSubClient.subscribe("/devices/ws2812b/controls/hueLoop");
}
теперь надо константу BRIGHTNESS переделать в переменную, а также ввести переменную hue_loop:
#define BRIGHTNESS  50
uint8_t BRIGHTNESS = 50;
bool hueLoop = true;

void modbusCallback(char* topic, byte* payload, unsigned int length) {
  char payloadChar[sizeof(payload)];

  Serial.print("Message arrived [");
  Serial.print(topic);
  Serial.print("] ");
  for (int i = 0; i < length; i++) {
    Serial.print((char)payload[i]);
    payloadChar[i] = (char)payload[i];
  }
  Serial.println();

  String payloadStr = String(payloadChar);

  if (topic == "/devices/ws2812b/controls/brightness") {
    BRIGHTNESS = payloadStr.toInt();
  }
  if (topic == "/devices/ws2812b/controls/hueLoop") {
    if(payloadChar == "true") {
      hueLoop = true;
    } else {
      hueLoop = false;
    }
  }
}

void ChangePalettePeriodically() {
   if(!hueLoop) {
       return;
   }
   ...
}
Теперь можно управлять runtime-переменными esp32 через wirenboard
Загрузка прошивки по WiFi
С учетом того что esp32 не всегда будет находиться рядом с компом, прошивать эту железка будет неудобно через кабель. Можно прикрутить возможность прошиваться через WiFi.
Установим модули
- AsyncElegantOTA
- ESPAsyncWebServer-esphome
Кодим функционал:
#include <Arduino.h>
#include <ESPAsyncWebServer.h>
#include <AsyncTCP.h>
#include <ESPAsyncWebServer.h>
#include <AsyncElegantOTA.h>

unsigned long ota_progress_millis = 0;
AsyncWebServer server(80);


void setupOTA(void) {
  server.on("/", HTTP_GET, [](AsyncWebServerRequest *request) {
    request->send(200, "text/plain", "Hi! This is a sample response.");
  });

  AsyncElegantOTA.begin(&server);    // Start AsyncElegantOTA
  server.begin();
  Serial.println("HTTP server started");
}
void setup() {
  setupOTA();
}
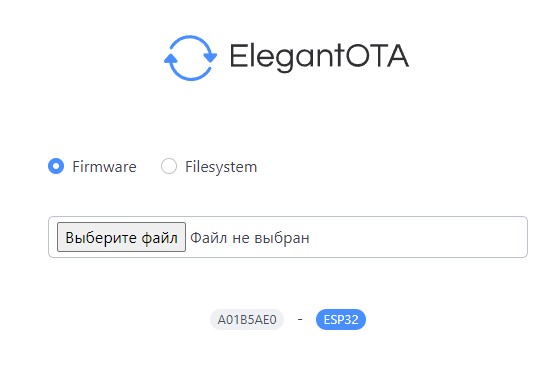
Теперь после запуска железки и получения ip-адреса будет доступен web-интерфейс (http://192.168.0.10/update), в котором можно выбрать прошивку и залить её по wi-fi, бонусом будет автоматический перезапуск железки после прошивки, то есть она сразу активируется.
Есть и минусы: если вы совершите ошибку в коде и будет возникал kernel panic / fatal, тогда вам уже точно придется тащить железку к компу и прошивать фикс через кабель
Финальный код скетча
- include <Arduino.h>
- include <FastLED.h>
- include <PubSubClient.h>
- include <WiFiClient.h>
- include <WiFi.h>
- include <ESPAsyncWebServer.h>
- include <AsyncTCP.h>
- include <ESPAsyncWebServer.h>
- include <AsyncElegantOTA.h>
unsigned long ota_progress_millis = 0; AsyncWebServer server(80); void setupOTA(void) {
 server.on("/", HTTP_GET, [](AsyncWebServerRequest *request) {
   request->send(200, "text/plain", "Hi! This is a sample response.");
 });
 AsyncElegantOTA.begin(&server);    // Start AsyncElegantOTA
 server.begin();
 Serial.println("HTTP server started");
}
- define WIFI_SSID "ssid"
- define WIFI_PASSWORD "xxx"
void setupWifi() {
 WiFi.mode(WIFI_STA);
 WiFi.begin(WIFI_SSID, WIFI_PASSWORD);
 char emptyMsg[1] = "";
 char pointMsg[2] = ".";
 Serial.println(emptyMsg);
   // Wait for connection
 while (WiFi.status() != WL_CONNECTED) {
   delay(500);
   Serial.println(pointMsg);
 }
 Serial.println(emptyMsg);
 char connectedToMsg[14] = "Connected to ";
 Serial.println(connectedToMsg);
 Serial.println(WIFI_SSID);
 char ipAddrMsg[30];
 sprintf(ipAddrMsg, "IP address: %s", WiFi.localIP().toString().c_str());
 Serial.println(ipAddrMsg);
}
// This example shows several ways to set up and use 'palettes' of colors // with FastLED. // // These compact palettes provide an easy way to re-colorize your // animation on the fly, quickly, easily, and with low overhead. // // USING palettes is MUCH simpler in practice than in theory, so first just // run this sketch, and watch the pretty lights as you then read through // the code. Although this sketch has eight (or more) different color schemes, // the entire sketch compiles down to about 6.5K on AVR. // // FastLED provides a few pre-configured color palettes, and makes it // extremely easy to make up your own color schemes with palettes. // // Some notes on the more abstract 'theory and practice' of // FastLED compact palettes are at the bottom of this file.
- define DIN_PIN 27
- define NUM_LEDS 5
- define LED_TYPE WS2811_400
- define COLOR_ORDER GRB
CRGB leds[NUM_LEDS];
- define UPDATES_PER_SECOND 50
uint8_t BRIGHTNESS = 50; bool hueLoop = true;
CRGBPalette16 currentPalette; TBlendType currentBlending;
extern CRGBPalette16 myRedWhiteBluePalette; extern const TProgmemPalette16 myRedWhiteBluePalette_p PROGMEM;
void setupFastLED(){
   delay( 3000 ); // power-up safety delay
   FastLED.addLeds<LED_TYPE, DIN_PIN, COLOR_ORDER>(leds, NUM_LEDS).setCorrection( TypicalLEDStrip );
   FastLED.setBrightness(  BRIGHTNESS );

   currentPalette = RainbowColors_p;
   currentBlending = LINEARBLEND;
}
- define MODBUS_SERVER "10.50.0.253"
- define MODBUS_PORT 1883
WiFiClient wifiClient; PubSubClient pubSubClient(wifiClient);
void modbusCallback(char* topic, byte* payload, unsigned int length) {
char payloadChar[sizeof(payload)];
 Serial.print("Message arrived [");
 Serial.print(topic);
 Serial.print("] ");
 for (int i = 0; i < length; i++) {
   Serial.print((char)payload[i]);
   payloadChar[i] = (char)payload[i];
 }
 Serial.println();
 String payloadStr = String(payloadChar);

 if (topic == "/devices/ws2812b/controls/brightness") {
   BRIGHTNESS = payloadStr.toInt();
 }
 if (topic == "/devices/ws2812b/controls/hueLoop") {
   if(payloadChar == "true") {
     hueLoop = true;
   } else {
     hueLoop = false;
   }
 }
}
void setupModbus() {
 pubSubClient.setServer(MODBUS_SERVER, MODBUS_PORT);
 pubSubClient.setCallback(modbusCallback);
 pubSubClient.subscribe("/devices/ws2812b/controls/brightness");
 pubSubClient.subscribe("/devices/ws2812b/controls/hueLoop");
}
void modbusReconnect() {
 // Loop until we're reconnected
 while (!pubSubClient.connected()) {
   Serial.print("Attempting MQTT connection...");
   // Create a random client ID
   String clientId = "ESP32Client-";
   clientId += String(random(0xffff), HEX);
   // Attempt to connect
   if (pubSubClient.connect(clientId.c_str())) {
     Serial.println("connected");
   } else {
     Serial.print("failed, rc=");
     Serial.print(pubSubClient.state());
     Serial.println(" try again in 5 seconds");
     // Wait 5 seconds before retrying
     delay(5000);
   }
 }
}
void modbusLoop() {
 if (!pubSubClient.connected()) {
   modbusReconnect();
 }
 pubSubClient.loop();
}
void ChangePalettePeriodically(); void FillLEDsFromPaletteColors( uint8_t colorIndex);
void FillLEDsFromPaletteColors( uint8_t colorIndex)
{
   uint8_t brightness = 255;

   for( int i = 0; i < NUM_LEDS; ++i) {
       leds[i] = ColorFromPalette( currentPalette, colorIndex, brightness, currentBlending);
       colorIndex += 3;
   }
}
// There are several different palettes of colors demonstrated here.
//
// FastLED provides several 'preset' palettes: RainbowColors_p, RainbowStripeColors_p,
// OceanColors_p, CloudColors_p, LavaColors_p, ForestColors_p, and PartyColors_p.
//
// Additionally, you can manually define your own color palettes, or you can write
// code that creates color palettes on the fly. All are shown here.
void SetupTotallyRandomPalette();
void SetupPurpleAndGreenPalette();
void SetupPurpleAndGreenPalette();
void SetupBlackAndWhiteStripedPalette();
void ChangePalettePeriodically() {
   uint8_t secondHand = (millis() / 1000) % 60;
   static uint8_t lastSecond = 99;

   if( lastSecond != secondHand) {
       lastSecond = secondHand;
       if( secondHand ==  0)  { currentPalette = RainbowColors_p;         currentBlending = LINEARBLEND; }
       if( secondHand == 10)  { currentPalette = RainbowStripeColors_p;   currentBlending = NOBLEND;  }
       if( secondHand == 15)  { currentPalette = RainbowStripeColors_p;   currentBlending = LINEARBLEND; }
       if( secondHand == 20)  { SetupPurpleAndGreenPalette();             currentBlending = LINEARBLEND; }
       if( secondHand == 25)  { SetupTotallyRandomPalette();              currentBlending = LINEARBLEND; }
       if( secondHand == 30)  { SetupBlackAndWhiteStripedPalette();       currentBlending = NOBLEND; }
       if( secondHand == 35)  { SetupBlackAndWhiteStripedPalette();       currentBlending = LINEARBLEND; }
       if( secondHand == 40)  { currentPalette = CloudColors_p;           currentBlending = LINEARBLEND; }
       if( secondHand == 45)  { currentPalette = PartyColors_p;           currentBlending = LINEARBLEND; }
       if( secondHand == 50)  { currentPalette = myRedWhiteBluePalette_p; currentBlending = NOBLEND;  }
       if( secondHand == 55)  { currentPalette = myRedWhiteBluePalette_p; currentBlending = LINEARBLEND; }
   }
}
// This function fills the palette with totally random colors. void SetupTotallyRandomPalette() {
   for( int i = 0; i < 16; ++i) {
       currentPalette[i] = CHSV( random8(), 255, random8());
   }
}
// This function sets up a palette of black and white stripes, // using code. Since the palette is effectively an array of // sixteen CRGB colors, the various fill_* functions can be used // to set them up. void SetupBlackAndWhiteStripedPalette() {
   // 'black out' all 16 palette entries...
   fill_solid( currentPalette, 16, CRGB::Black);
   // and set every fourth one to white.
   currentPalette[0] = CRGB::White;
   currentPalette[4] = CRGB::White;
   currentPalette[8] = CRGB::White;
   currentPalette[12] = CRGB::White;
}
// This function sets up a palette of purple and green stripes. void SetupPurpleAndGreenPalette() {
   CRGB purple = CHSV( HUE_PURPLE, 255, 255);
   CRGB green  = CHSV( HUE_GREEN, 255, 255);
   CRGB black  = CRGB::Black;

   currentPalette = CRGBPalette16(
                                  green,  green,  black,  black,
                                  purple, purple, black,  black,
                                  green,  green,  black,  black,
                                  purple, purple, black,  black );
}
// This example shows how to set up a static color palette
// which is stored in PROGMEM (flash), which is almost always more
// plentiful than RAM. A static PROGMEM palette like this
// takes up 64 bytes of flash.
const TProgmemPalette16 myRedWhiteBluePalette_p PROGMEM =
{
   CRGB::Red,
   CRGB::Gray, // 'white' is too bright compared to red and blue
   CRGB::Blue,
   CRGB::Black,

   CRGB::Red,
   CRGB::Gray,
   CRGB::Blue,
   CRGB::Black,

   CRGB::Red,
   CRGB::Red,
   CRGB::Gray,
   CRGB::Gray,
   CRGB::Blue,
   CRGB::Blue,
   CRGB::Black,
   CRGB::Black
};
// Additional notes on FastLED compact palettes: // // Normally, in computer graphics, the palette (or "color lookup table") // has 256 entries, each containing a specific 24-bit RGB color. You can then // index into the color palette using a simple 8-bit (one byte) value. // A 256-entry color palette takes up 768 bytes of RAM, which on Arduino // is quite possibly "too many" bytes. // // FastLED does offer traditional 256-element palettes, for setups that // can afford the 768-byte cost in RAM. // // However, FastLED also offers a compact alternative. FastLED offers // palettes that store 16 distinct entries, but can be accessed AS IF // they actually have 256 entries; this is accomplished by interpolating // between the 16 explicit entries to create fifteen intermediate palette // entries between each pair. // // So for example, if you set the first two explicit entries of a compact // palette to Green (0,255,0) and Blue (0,0,255), and then retrieved // the first sixteen entries from the virtual palette (of 256), you'd get // Green, followed by a smooth gradient from green-to-blue, and then Blue.
- define LED_PIN 2
int led_status = HIGH;
void ledUpdate(int v) {
digitalWrite(LED_PIN, v);
}
void ledBlink( void * parameter ) {
 const TickType_t xDelay = 1000 / portTICK_PERIOD_MS;
 for(;;) {
   switch (led_status)
   {
   case HIGH:
     led_status = LOW;
     break;
   default:
     led_status = HIGH;
     break;
   }
   ledUpdate(led_status);
   vTaskDelay(xDelay);
   Serial.printf("blink %d\n", led_status);
 }
}
void setupLedBlink() {
pinMode(LED_PIN, OUTPUT);
   xTaskCreate(
                   ledBlink,          /* Task function. */
                   "ledBlink",        /* String with name of task. */
                   10000,            /* Stack size in bytes. */
                   NULL,             /* Parameter passed as input of the task */
                   1,                /* Priority of the task. */
                   NULL);            /* Task handle. */
}
void setup() {
   Serial.begin(9600);
   setupLedBlink();
   setupWifi();
   setupFastLED();
   setupModbus();
   setupOTA();
}
void loop() {
   modbusLoop();
   if(!hueLoop) {
       return;
   }
   ChangePalettePeriodically();

   static uint8_t startIndex = 0;
   startIndex = startIndex + 1; /* motion speed */

   FillLEDsFromPaletteColors( startIndex);

   FastLED.show();
   FastLED.delay(1000 / UPDATES_PER_SECOND);
} </syntaxhighlight>
