Buzzer/en: различия между версиями
(Новая страница: «After that, the /sys/class/pwm/pwmchip0/pwm2 directory appears») |
Matveevrj (обсуждение | вклад) |
||
| (не показано 25 промежуточных версий 3 участников) | |||
| Строка 1: | Строка 1: | ||
<languages/> | <languages/> | ||
{{DISPLAYTITLE:Buzzer}} | |||
PWM | ==Description== | ||
The Wiren Board controller has a Buzzer (sound emitter) on board. The buzzer is powered by 5V and controlled by the CPU's gpio pin in PWM mode. The buzzer can be controlled through the sysfs interface of the kernel and various software on top of it. Also, it can be controlled via the web interface, the wb-rules rule engine and python. | |||
==Controlling via web-interface== | |||
[[File:buzzer.png |300px|thumb|right| Buzzer control]] | |||
In the web-interface of the controller, buzzer control is available in the ''"Devices"'' tab. Parameter ''"Frequency"'' - sound frequency in Hz. ''"Volume"'' - volume (in conventional units, linear scale). The settings are saved when the controller is rebooted. | |||
==Controlling via rule engine== | |||
The buzzer control displayed in the web interface is a virtual device created by the wb-rules system rule when the controller starts. The source code of the rule is available [https://github.com/wirenboard/wb-rules-system/blob/master/rules/buzzer.js on our github]. | |||
You can learn more about virtual devices usage in the [[wb-rules|description of the rules engine]]. | |||
The system rule internally implements tone and volume recalculation (see [[#About PWM and parameter recalculation|section on recalculation]]) and work with pwm via sysfs (see [[#Working from sysfs|corresponding section]]). Outside, the user has access to the ''"buzzer"'' device, which has several mqtt controls: | |||
{| class="wikitable" | |||
!Device||Control||Type||Max value||Description | |||
|- | |||
|rowspan="3"|Buzzer | |||
|Frequency | |||
|range | |||
|7000 | |||
|Sound frequency | |||
|- | |||
|Volume | |||
|range | |||
|100 | |||
| Volume,% | |||
|- | |||
|Enabled | |||
|Switch | |||
| | |||
|Enable/Disable | |||
|} | |||
Device controls can be used in custom rules. More details about the structure of mqtt topics for virtual and physical devices can be found in our [https://github.com/wirenboard/conventions/blob/main/README.md mqtt convention]. | |||
==Controlling via python== | |||
On Wiren Board controllers, you can work with the buzzer from python using the ''beeper'' module from the ''wb_common'' package. This is a wrapper around the sysfs interface. The module is preinstalled on all controllers as part of the ''python-wb-common'' deb package. The source code is available [https://github.com/wirenboard/wb-common/blob/master/wb_common/beeper.py on our github]. | |||
Working example from python: | |||
<syntaxhighlight lang="python"> | |||
from wb_common import beeper | |||
beeper.beep(0.5, 2) | |||
</syntaxhighlight> | |||
All sysfs interface settings are supported (recalculation must be done manually; see [[#About PWM and parameter recalculation|section on recalculation]]). | |||
==Low-level work== | |||
===About PWM and parameter recalculation=== | |||
[[File:Duty_cycle.gif|440px|thumb|right|Duty cycle controls LED brightness/buzzer volume]] | |||
PWM is a common way to control the power delivered to a load. | |||
In the context of buzzer control, we are interested in 2 PWM parameters: | |||
* Duty cycle - affects the volume of the sound. Usually, it is considered as a percentage of the signal period. | |||
* PWM frequency (frequency) - affects the pitch (the higher the frequency, the higher the sound). The unit that is the reciprocal of the signal period. | |||
The Linux kernel provides a sysfs interface to pwm that accepts a pwm frequency and a duty cycle in '''nanoseconds (10<sup>-9</sup>S)'''! Therefore, for low-level control of the Buzzer, it is necessary to recalculate the desired frequency from kHz to a period in nanoseconds using the formula: | |||
<b> | <b> | ||
T(ns) = 1 000 000 / f(kHz) | T(ns) = 1,000,000 / f(kHz) | ||
</b> | </b> | ||
===Pwm port number for sysfs=== | |||
The gpio pin is configurable like the PWM output in the dts of the linux kernel. For more details, see [[https://github.com/wirenboard/linux/blob/ef2d87e222b365848fe7262c022ca887b6449432/arch/arm/boot/dts/imx6ul-wirenboard61.dts#L495 on our github]]. | |||
*For WB6.X.X controllers, port number = 0, (for all controllers up to WB6.X.X, port number = 2) | |||
*The port number can be found by running <syntaxhighlight lang="bash">echo $WB_PWM_BUZZER</syntaxhighlight> | |||
</ | In all examples below, we will assume that the pwm port number = 0. | ||
===Working from sysfs=== | |||
To work with pwm through sysfs you need: | |||
< | #Export port <syntaxhighlight lang="bash">echo 0 > /sys/class/pwm/pwmchip0/export</syntaxhighlight>After that, the /sys/class/pwm/pwmchip0/pwm0 directory appears | ||
echo 1 > /sys/class/pwm/pwmchip0/ | # Write the pwm period in nanoseconds <syntaxhighlight lang="bash">echo 250000 > /sys/class/pwm/pwmchip0/pwm0/period # set the period to 250,000 ns, i.e. in 250µs, which corresponds to a frequency of 4kHz</syntaxhighlight> | ||
</ | #Record volume (calculated from duty-cycle) <syntaxhighlight lang="bash">echo 125000 > /sys/class/pwm/pwmchip0/pwm0/duty_cycle # maximum volume is reached when duty_cycle = period / 2 => set duty_cycle to 125,000 ns</syntaxhighlight> | ||
#Enable PWM output <syntaxhighlight lang="bash">echo 1 > /sys/class/pwm/pwmchip0/pwm0/enable</syntaxhighlight> | |||
To turn off the buzzer, write 0: <syntaxhighlight lang="bash">echo 0 > /sys/class/pwm/pwmchip0/pwm0/enable</syntaxhighlight> | |||
< | |||
echo 0 > /sys/class/pwm/pwmchip0/ | |||
</ | |||
[https://github.com/contactless/wirenboard/tree/master/examples/beeper ''' | [https://github.com/contactless/wirenboard/tree/master/examples/beeper '''An example of a bash script for working with pwm'''] | ||
Set the period in nanoseconds. The conversion from frequency (in kilohertz) to period (in nanoseconds) is performed using the formula: | |||
<b> | |||
T(ns) = 1,000,000 / f(kHz) | |||
</b> | |||
Текущая версия на 23:11, 3 октября 2022
Description
The Wiren Board controller has a Buzzer (sound emitter) on board. The buzzer is powered by 5V and controlled by the CPU's gpio pin in PWM mode. The buzzer can be controlled through the sysfs interface of the kernel and various software on top of it. Also, it can be controlled via the web interface, the wb-rules rule engine and python.
Controlling via web-interface
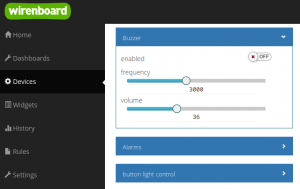
In the web-interface of the controller, buzzer control is available in the "Devices" tab. Parameter "Frequency" - sound frequency in Hz. "Volume" - volume (in conventional units, linear scale). The settings are saved when the controller is rebooted.
Controlling via rule engine
The buzzer control displayed in the web interface is a virtual device created by the wb-rules system rule when the controller starts. The source code of the rule is available on our github.
You can learn more about virtual devices usage in the description of the rules engine.
The system rule internally implements tone and volume recalculation (see section on recalculation) and work with pwm via sysfs (see corresponding section). Outside, the user has access to the "buzzer" device, which has several mqtt controls:
| Device | Control | Type | Max value | Description |
|---|---|---|---|---|
| Buzzer | Frequency | range | 7000 | Sound frequency |
| Volume | range | 100 | Volume,% | |
| Enabled | Switch | Enable/Disable |
Device controls can be used in custom rules. More details about the structure of mqtt topics for virtual and physical devices can be found in our mqtt convention.
Controlling via python
On Wiren Board controllers, you can work with the buzzer from python using the beeper module from the wb_common package. This is a wrapper around the sysfs interface. The module is preinstalled on all controllers as part of the python-wb-common deb package. The source code is available on our github.
Working example from python:
from wb_common import beeper

beeper.beep(0.5, 2)
All sysfs interface settings are supported (recalculation must be done manually; see section on recalculation).
Low-level work
About PWM and parameter recalculation
PWM is a common way to control the power delivered to a load.
In the context of buzzer control, we are interested in 2 PWM parameters:
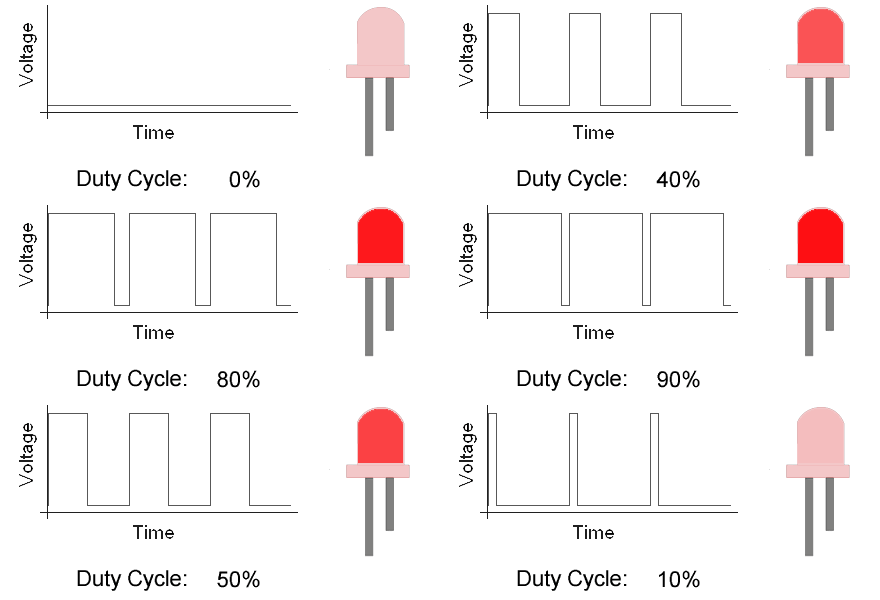
- Duty cycle - affects the volume of the sound. Usually, it is considered as a percentage of the signal period.
- PWM frequency (frequency) - affects the pitch (the higher the frequency, the higher the sound). The unit that is the reciprocal of the signal period.
The Linux kernel provides a sysfs interface to pwm that accepts a pwm frequency and a duty cycle in nanoseconds (10-9S)! Therefore, for low-level control of the Buzzer, it is necessary to recalculate the desired frequency from kHz to a period in nanoseconds using the formula: T(ns) = 1,000,000 / f(kHz)
Pwm port number for sysfs
The gpio pin is configurable like the PWM output in the dts of the linux kernel. For more details, see [on our github].
- For WB6.X.X controllers, port number = 0, (for all controllers up to WB6.X.X, port number = 2)
- The port number can be found by running
echo $WB_PWM_BUZZER
In all examples below, we will assume that the pwm port number = 0.
Working from sysfs
To work with pwm through sysfs you need:
- Export port After that, the /sys/class/pwm/pwmchip0/pwm0 directory appears
echo 0 > /sys/class/pwm/pwmchip0/export
- Write the pwm period in nanoseconds
echo 250000 > /sys/class/pwm/pwmchip0/pwm0/period # set the period to 250,000 ns, i.e. in 250µs, which corresponds to a frequency of 4kHz
- Record volume (calculated from duty-cycle)
echo 125000 > /sys/class/pwm/pwmchip0/pwm0/duty_cycle # maximum volume is reached when duty_cycle = period / 2 => set duty_cycle to 125,000 ns
- Enable PWM output
echo 1 > /sys/class/pwm/pwmchip0/pwm0/enable
To turn off the buzzer, write 0:
echo 0 > /sys/class/pwm/pwmchip0/pwm0/enable
An example of a bash script for working with pwm
Set the period in nanoseconds. The conversion from frequency (in kilohertz) to period (in nanoseconds) is performed using the formula: T(ns) = 1,000,000 / f(kHz)

