WB-MIR v2 - Modbus IR Remote Control
This page describes the WB-MIR v2 device, which is being released from 11.2017. Previous model description: WB-MIR v1.
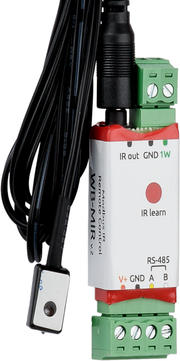
Trainable module with IR transceiver for IR control of various devices, including air conditioners, TVs, etc. The module is controlled from the controller or PC via RS-485 bus by Modbus RTU Protocol commands.
Inputs
The module is powered by V+ and GND screw terminals, the RS-485 line is connected to inputs A and B. The DS18B20 external temperature sensor is connected via a parasitic power supply circuit, when the +5V and GND terminals are connected and connected to the GND terminal, the data output is connected to the 1-W(1-Wire) terminal.
Depending on the modification, the device may have an internal temperature sensor (NTC thermistor).
The WB-MIR v2 module requires an external IR transmitter (included). A 3.5 mm Jack is provided for connecting the transmitter.
In the firmware version 4.0.0 and above, it is also possible to configure the 1-W input of the device as a counting one.
Installation
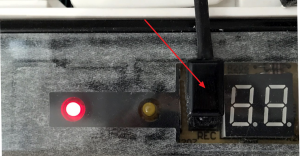
The module is mounted in the immediate vicinity of the device or inside the housing of a controlled device, such as an air conditioner. If further training or retraining of the module is planned after installation, the IR receiver should be located in an accessible place. The IR transmitter, placed on a wire, ~140 cm long, is attached next to the IR receiver of the controlled device to a double-sided tape (included) so as to ensure stable transmission of IR control commands, but to retain the ability to control the device from the remote without blocking the IR receiver of the device completely.
Specifications
| Option | Value |
|---|---|
| Power | |
| Supply voltage | 9 — 24 V DC |
| Power consumption |
0.1 W |
| Transmitter range | < 1m |
| External sensor | Digital temperature sensor DS18B20 can be connected. |
| Terminals and wire section | |
| Recommended wire cross-section with NSUI, mm2 | 0,75 — 1 |
| Length of the standard sleeve NSUI, mm | 8 |
| Torque of screws, N∙m | 0,2 |
| Control | |
| Management interface | RS-485 |
| Interface isolation | Uninsulated |
| Communication protocol | Modbus RTU, address is set by software, factory settings are indicated on the label |
| RS-485 interface parameters |
speed 9600 bps; data bits 8; parity N; stop bits 2; Starting from firmware version 3.1.0 parameters interfaces can be configured programmatically:
|
| Number of stored IR commands | |
| Number of teams |
|
| Command duration | The maximum command length is 508 registers, plus two registers indicates the end of the command.Each register encodes the duration of a high or low signal level (sequentially) in microseconds. |
| dimensions | |
| L x W x h |
|
| operating Conditions | |
| Air temperature | -40°C to +80°C |
| Relative humidity | up to 98%,without moisture condensate |
Learning and using the module
Detailed description and use of the module, and a map of the registers is described in section how to work with the IR receiver in the WB-MS WB-MSW, WB-MIR devices.
Additional functionality
Address change is broadcast (slave_id 0) team record (WRITE_SINGLE_REGISTER) to holding register with address 128 (0x80).
The signature, 6 bytes long, lies at address 200. The signature is unique for each device model and allows you to identify the model. To obtain the signatures, fulfill READ_HOLDING_REGISTERS address 200 length 6. Writing to this area of memory is not supported and error 3 is returned when attempting to write to an invalid location.
Register map
Registers related to IR are described in detail in the section instructions for working with IR transceiver in WB-MS, WB-MSW, WB-MIR devices.
| Register/ address | Type | Read/ write | Default | Format | Purpose | Versions
insertions |
|---|---|---|---|---|---|---|
| 6 | input | R | 0x7FFF | °C × 16 (signed) | Temperature with built-in sensor | |
| 7 | input | R | 0x7FFF | °C × 16 (signed) | Temperature from external 1-Wire sensor | |
| 20 | input | R | 0 | °C × 16 (signed) | Temperature from the first external 1-Wire sensor. In case of an error, the sensor retains the previous valid value (sensor status read from the discrete register 16). | starting with firmware 4.6.0 |
| 104-105 | input | R | 32-bit unsigned int | uptime counter in seconds | ||
| 110 | holding | RW | 96 | baud rate / 100 | RS-485 port speed, "'divided by 100"'. Permissible speeds: 1200, 2400, 4800, 9600, 19200, 38400, 57600, 115200 (configure RS-485 communication parameters for Wiren Board Modbus devices) |
>3.1.0 |
| 111 | holding | RW | 0 | configure the RS-485 port parity bit. Valid values: 0 - no parity bit (none), 1 - odd (odd), 2 - even (even) | ||
| 112 | holding | RW | 2 | number of stop bits of RS-485 port. Valid values: 1, 2 | ||
| 120 (0x78) | holding | RW | 0 | other than 0 | write to the register causes a reset of the module without saving state | |
| 121 (0x79) | input | R | - | mV | current supply voltage of the module | |
| 128 (0x80) | holding | RW | 1 | The Modbus address of the device | ||
| 129 (0x81) | holding | RW | 0 | 0 or 1 | Switch to bootloader mode | starting with firmware 4.5.0 |
| 200-206 | input | R | see device Signature | signature | ||
| 220-241 | input | R | __date__ _ _ time__ | the build date of the firmware | ||
| 245 | holding | RW | 216 | °C × 100 (signed) | Self-heating compensation of the built-in temperature sensor.
The register value is subtracted from the temperature measured by the built-in sensor (register 6) |
|
| 250-269 | input | R | string, null-terminated | firmware version | ||
| 270-271 | input | R | 32-bit unsigned int | unique identifier (S/N) | ||
| 275 | holding | RW | 0 | 0 or 1 | 1-W input mode: 0 - 1-wire, 1 - discrete input | >=4.0.0 |
| 277 | input | R | 16-bit unsigned int | Counter for 1-W input | ||
| 0 | discrete | R | 0 or 1 | Current state of input 1-W: 0 - open, 1 - GND closed. If 1-wire mode is selected for input, the value is always 0. | ||
| 16 | discrete | R | 0 or 1 | Sensor polling status 1-Wire input no. 1: 0 - sensor not connected, 1 - sensor connected and correctly polled | starting with firmware v.4.6.0 |
Device signature
The 6-byte module signature is stored at address 200. The signature is unique for each model of Wiren Board devices and allows to identify the model by Modbus:
| Module | Signature |
|---|---|
| WB-MIR | WBMIR'0x00' |
To get the signature of a device you need to run command READ_HOLDING_REGISTERS at 200 (length of 6 registers). Writing to this area of memory is not supported, and error 3 is returned when attempting to write to an invalid location. Empty spaces in the signature text are clogged with the value 0x00. Starting from register 220, the firmware build date is recorded, in the format numberx00timex00 as a string (example: 'Jan 27 2017 17:01:13'). The length of the record is 21 registers.
Module management from the web interface
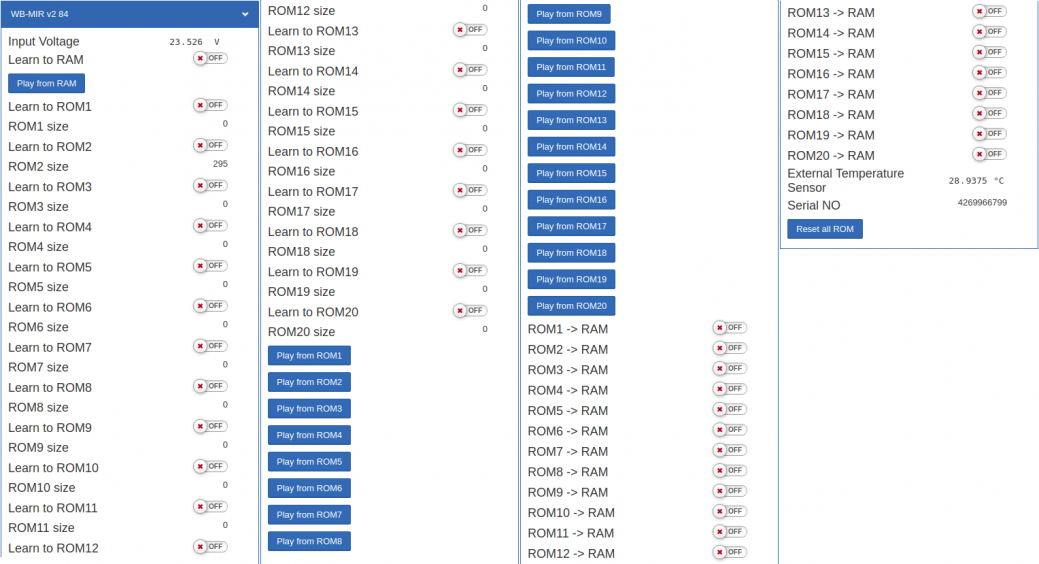
To connect the WB-MIR v2 module, use the WB-MIR v2 template, which provides a complete set of module functions from the web interface, including learning.
Consider the main controls of the module and their purpose.
| Название элемента управления | Назначение |
|---|---|
| Input Voltage | Напряжение питания модуля |
| Learn to RAM | Запись ИК-сигнала в оперативный буфер (см. раздел Оперативный режим). Для обучения контрол переводится в положение ON, после обучения — OFF. |
| Play from RAM | Воспроизведение ИК-сигнала из оперативного буфера (см. раздел Оперативный режим). |
| Learn to ROMx | Запись ИК-сигнала в соотв. ячейку ПЗУ (см. раздел Постоянный режим). Для обучения контрол переводится в положение ON, после обучения — OFF. |
| Play from ROMx | Воспроизведение ИК-сигнала из соотв. ячейки ПЗУ (см. раздел Постоянный режим). Для обучения контрол переводится в положение ON, после обучения — OFF. |
| ROMx -> RAM | Копирование данных из соотв. ячейки ПЗУ в оперативный буфер для редактирования (см. раздел Постоянный режим). Для редактирования контрол переводится в положение ON, после редактирования — OFF. |
| Internal/External Temperature Sensor | Температура внутреннего/внешнего цифрового датчика. Если датчик отсутствует или неисправен, его название выделяется красным цветом. |
| Serial NO | Серийный номер модуля WB-MIR, может потребоваться при обращении в техподдержку. |
| Reset all ROM | Сброс содержимого всех ячеек памяти. Будьте внимательны, очистка ПЗУ будет выполнена без запроса на подтверждение! |
Управление модулем из командной строки
Программное обеспечение контроллера Wiren Board включает в себя утилиту modbus_client для работы с устройствами, подключенными к выходам RS-485, по протоколу Modbus, подробное описание команды находится на странице Modbus-client. Доступ к командной строке описан в статье SSH.
Пример чтения регистров
Проверим, верно ли, что мы подключились именно к модулю нужного типа. (Модуль wb-mqtt-serial должен быть предварительно остановлен). По адресу 200 хранится уникальная сигнатура длиной в 6 регистров. Прочтем 6 регистров, начиная с адреса 200, и преобразуем полученный ответ из шестнадцатеричных цифр в символьную строку:
echo  -e `modbus_client --debug -mrtu -pnone -s2 /dev/ttyAPP1 \
-a1 -t0x03 -r200 -c 6 | \
grep Data | sed -e 's/0x00/\\\x/g' -e 's/Data://' -e 's/\s//g'`
В результате выполнения команды получаем строку, например WBMIR. В этом примере модуль WB-MIR имеет Modbus-адрес 1.
Обновление прошивки устройства
Начиная с новых версий микропрограмм устройства поддерживается функционал обновления прошивки (микропрограммы) по протоколу Modbus. Это дает возможность расширять функциональные возможности устройств и устранять ошибки в микропрограммном обеспечении непосредственно на месте монтажа. Подробнее о перепрошивке устройств рассказано в статье Загрузка прошивок на устройства Wiren Board. Список версий прошивок, поддерживающих обновление, а также устройств, для которых эта функция реализована, можно найти в статье Firmware_Changelog.
Изображения и чертежи устройства
По ссылкам ниже вы можете скачать изображения и чертежи устройства WB-MIR2.
Corel Draw 2018: WB-MIR2.cdr.zip
Corel Draw PDF: WB-MIR2.cdr.pdf
Autocad 2013 DXF: WB-MIR2.dxf.zip
Autocad PDF: WB-MIR2.pdf


