WB5 root password recovery/en: различия между версиями
(Новая страница: «<!--{{DISPLAYTITLE:WB6 root password recovery}}-->») |
(Новая страница: «==Root password recovery procedure on Wiren Board 5== # Plug the USB-UART adapter to the controller. The connection is described in detail on the page Debug_UAR…») |
||
| (не показана 1 промежуточная версия этого же участника) | |||
| Строка 3: | Строка 3: | ||
<!--{{DISPLAYTITLE:WB6 root password recovery}}--> | <!--{{DISPLAYTITLE:WB6 root password recovery}}--> | ||
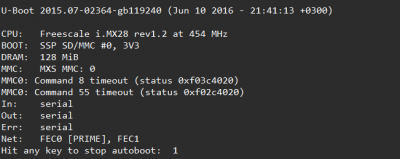
[[File:Stop_autoboot.png|thumb | 400px| | [[File:Stop_autoboot.png|thumb | 400px| uboot autoboot stop]] | ||
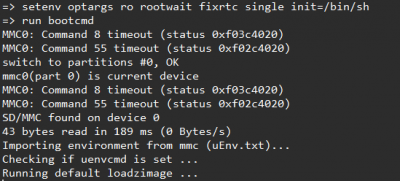
[[File:Stop_autoboot_commands.png|thumb | 400px|Stop_autoboot_commands.png| | [[File:Stop_autoboot_commands.png|thumb | 400px|Stop_autoboot_commands.png| Entering commands]] | ||
== | ==Root password recovery procedure on Wiren Board 5== | ||
# | # Plug the USB-UART adapter to the controller. The connection is described in detail on the page [[Debug_UART|Debug UART]]. Note that in the latest versions of the controller, the UART debug port is represented as a microUSB connector, so no additional USB-UART Converter is required. | ||
# | # Turn on the power of the controller and in the UART-console quickly press any key. | ||
# ''' | # '''Very fast''' sequentially enter the commands (it is better to copy them in advance to the clipboard):<br/><code>setenv optargs rootwait fixrtc single init=/bin/sh</code><br/><code>run bootcmd</code><br/>If the commands enter slowly (manually), the interrupted boot process will continue. | ||
# | # Load and get the system prompt <code>#</code> | ||
# | # Mount the root filesystem<br/><code>mount -n -o remount,rw /dev/mmcblk0p2 /</code><br/>and get the message <code> EXT4-fs (mmcblk0p2): re-mounted. Opts: (null)</code> | ||
# | #Mount the partition from the configuration backup:<br/><code>mount /dev/mmcblk0p6 /mnt/data</code><br/>and get the message <code>EXT4-fs (mmcblk0p6): mounted filesystem with ordered data mode. Opts: (null)</code> | ||
# | #Enter the command <code>passwd</code> and change the password. Successful password change: <code>passwd: password updated successfully</code> | ||
# | #Copy the new password to the configuration backup section:<br/><code>cp /etc/shadow /mnt/data/etc</code> | ||
# | #Unmount all:<br/><code> # sync</code><br/><code> # umount /mnt/data</code><br/><code> # umount /</code> | ||
# | #Turn off and turn on the power again. The password is changed. | ||
Текущая версия на 19:57, 19 июля 2019
Root password recovery procedure on Wiren Board 5
- Plug the USB-UART adapter to the controller. The connection is described in detail on the page Debug UART. Note that in the latest versions of the controller, the UART debug port is represented as a microUSB connector, so no additional USB-UART Converter is required.
- Turn on the power of the controller and in the UART-console quickly press any key.
- Very fast sequentially enter the commands (it is better to copy them in advance to the clipboard):
setenv optargs rootwait fixrtc single init=/bin/shrun bootcmd
If the commands enter slowly (manually), the interrupted boot process will continue. - Load and get the system prompt
# - Mount the root filesystem
mount -n -o remount,rw /dev/mmcblk0p2 /
and get the messageEXT4-fs (mmcblk0p2): re-mounted. Opts: (null) - Mount the partition from the configuration backup:
mount /dev/mmcblk0p6 /mnt/data
and get the messageEXT4-fs (mmcblk0p6): mounted filesystem with ordered data mode. Opts: (null) - Enter the command
passwdand change the password. Successful password change:passwd: password updated successfully - Copy the new password to the configuration backup section:
cp /etc/shadow /mnt/data/etc - Unmount all:
# sync# umount /mnt/data# umount / - Turn off and turn on the power again. The password is changed.

