WBE2R-R-ZIGBEE v.1 ZigBee Extension Module/en: различия между версиями
(Новая страница: «Instructions for setting up the controller Wiren Board 6: Подключение устройств ZigBee| are here») |
FuzzyBot (обсуждение | вклад) м (FuzzyBot переименовал страницу WBE2R-R-ZIGBEE ZigBee Extension Module/en в WBE2R-R-ZIGBEE v.1 ZigBee Extension Module/en без оставления перенаправления: Часть переводимой страницы WBE2R-R-ZIGBEE ZigBee Extension Module.) |
||
| (не показано 16 промежуточных версий 2 участников) | |||
| Строка 1: | Строка 1: | ||
<languages/> | <languages/> | ||
== Antenna == | == Antenna == | ||
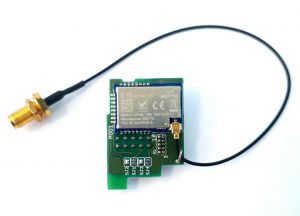
[[Файл:WBE2R-R-ZIGBEE top.jpg|300px|thumb|right| WBE2R-R-ZIGBEE front side]] | [[Файл:WBE2R-R-ZIGBEE top.jpg|300px|thumb|right| WBE2R-R-ZIGBEE front side]] | ||
| Строка 31: | Строка 31: | ||
Instructions for setting up the controller [[Wb-zigbee|Wiren Board 6: Подключение устройств ZigBee| are here]] | Instructions for setting up the controller [[Wb-zigbee|Wiren Board 6: Подключение устройств ZigBee| are here]] | ||
== | == Module installation == | ||
Installation of the module is possible in any of the MOD1-3 internal slots. The procedure for installing the module into the controller is shown on page[[Wiren Board 5: Модуль расширения GPS/Glonass#Установка модуля/en| GPS/GLONASS module installation]] ( similar to the WB5) | |||
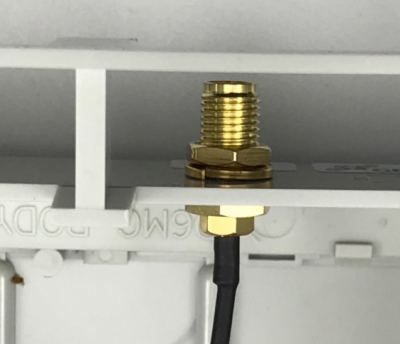
[[Файл:RF_SMA_Socket.png|thumb|400px|right| | [[Файл:RF_SMA_Socket.png|thumb|400px|right|Installation of antenna SMA-socket]] | ||
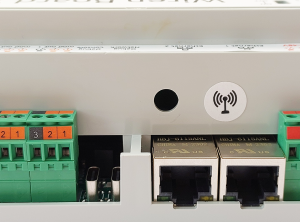
The SMA connector is installed in a special hole in the controller housing above the Ethernet connectors (drilled into the controller housing starting from the Wiren Board 6.5 version). In Wiren Board 6 models of earlier versions, a hole with a diameter of 6.5 mm must be drilled at the specified location. | |||
SMA | The SMA socket of the module must be fixed in the hole in the housing. When reassembling the housing, make sure that the connecting cable from the module to the SMA socket does not get caught between the indicator and the plastic transparent light guide on the top cover of the controller. | ||
The external antenna is screwed onto the SMA socket. | |||
{| class="wikitable" | {| class="wikitable" | ||
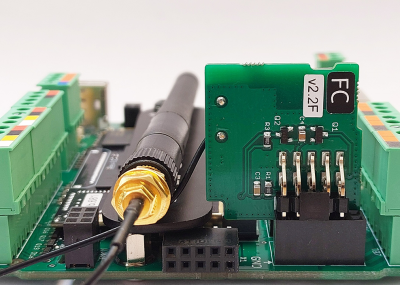
| [[Файл:WBE2S_Mod3.png|thumb|center|400px| | | [[Файл:WBE2S_Mod3.png|thumb|center|400px|Installing module into Mod3 slot]] || [[Файл:RF_SMA_Mounting_Place.png|thumb|center|300px|It is necessary to cut the case jumpers by cutting pliers or break the plug with a screwdriver]] | ||
|} | |} | ||
== | == Adding the module to the Web interface == | ||
In the Web interface section '''Configs''' '''=>''' '''Hardware Modules Configuration''' select in the list of expansion slots, select the slot in which you installed the module, for example, '''Internal slot 3''', and in the list '''Module type''' select the module '''WBE2R-R-ZIGBEE'''. Click the '''Save''' button to add the module to the controller configuration. | |||
== | == Hardware == | ||
WBE2R-R-ZIGBEE | WBE2R-R-ZIGBEE is equipped with Ebyte E18-MS1PA1-IPX module. Characteristics are available [http://www.ebyte.com/en/product-view-news.aspx?id=123 on the manufacturer's Website] | ||
There are module chip CC2530 and amplifier CC2592 by Texas Instruments on the module board. Power is 20dBm(100mW). | |||
== | == Firmware == | ||
If necessary, the module can be flashed with any compatible firmware. Firmware instructions can be found on the page [[Wb-zigbee#.D0.9F.D1.80.D0.BE.D1.88.D0.B8.D0.B2.D0.BA.D0.B0/en|Wiren Board 6:Connecting Zigbee devices]] | |||
Текущая версия на 15:34, 31 марта 2022
Antenna
The module is not equipped with an antenna. The external antenna is connected via the RP-SMA connector.
When ordering a Wiren Board controller with the module, the external antenna connector is installed on the controller body.
Data
Data exchange with the module is carried out via the serial port.
Operation in Wiren Board 6
| Extension module | Serial port |
|---|---|
| MOD1 | /dev/ttyMOD1 |
| MOD2 | /dev/ttyMOD2 |
| MOD3 | /dev/ttyMOD3 |
Instructions for setting up the controller Wiren Board 6: Подключение устройств ZigBee| are here
Module installation
Installation of the module is possible in any of the MOD1-3 internal slots. The procedure for installing the module into the controller is shown on page GPS/GLONASS module installation ( similar to the WB5)
The SMA connector is installed in a special hole in the controller housing above the Ethernet connectors (drilled into the controller housing starting from the Wiren Board 6.5 version). In Wiren Board 6 models of earlier versions, a hole with a diameter of 6.5 mm must be drilled at the specified location. The SMA socket of the module must be fixed in the hole in the housing. When reassembling the housing, make sure that the connecting cable from the module to the SMA socket does not get caught between the indicator and the plastic transparent light guide on the top cover of the controller. The external antenna is screwed onto the SMA socket.
Adding the module to the Web interface
In the Web interface section Configs => Hardware Modules Configuration select in the list of expansion slots, select the slot in which you installed the module, for example, Internal slot 3, and in the list Module type select the module WBE2R-R-ZIGBEE. Click the Save button to add the module to the controller configuration.
Hardware
WBE2R-R-ZIGBEE is equipped with Ebyte E18-MS1PA1-IPX module. Characteristics are available on the manufacturer's Website There are module chip CC2530 and amplifier CC2592 by Texas Instruments on the module board. Power is 20dBm(100mW).
Firmware
If necessary, the module can be flashed with any compatible firmware. Firmware instructions can be found on the page Wiren Board 6:Connecting Zigbee devices
