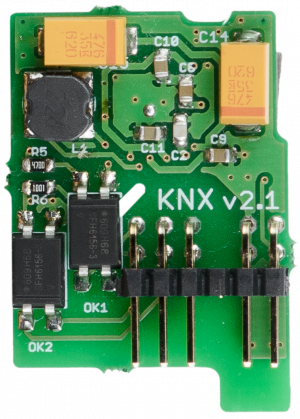
KNX Module for WB6 (WBE2-I-KNX)
Pinout
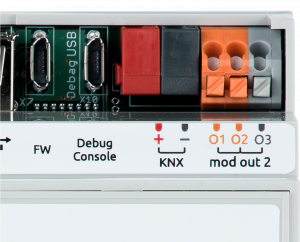
| Terminal | Function |
|---|---|
| O1 (Red) | KNX (+) |
| O2 (n/a) | n/a |
| O3 (Gray) | KNX (-) |
Configuration
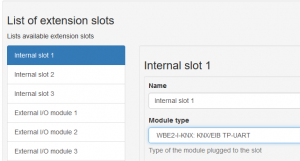
You need to set the module type in the web interface, sectionConfigs => Hardware Modules Configuration: for Internal slot 1 (MOD1) or for Internal slot 2 (MOD2) depending on the KNX module position.
Working via iRidium Server
Download the latest version of the installation of a deb package signed the iRidium server for Raspbian Jessie with the PIXEL 0 and WB (gen 6) here iRidium Pro downloads
copy the file to the controller (detailed description of how to copy files to the controller) and install it by running the command
dpkg -i iridiumserver_1.3.0-15590_RPI.deb
Go to the iRidium Server web interface via the link your_wirenboard_address:8888 and log in to the server.
Next, when you create the project, add the KNX Serial (UMC) driver and configure it as shown below
use /dev/ttyMOD2 if the module is installed in the second extension slot
Working via MQTT
Go to the console and install the packages wb-mqtt-knx (MQTT KNX Bridge), knxd, knxd-tools:
apt-get update
apt-get install knxd knxd-tools wb-mqtt-knx
After installation, you must edit the file /etc/default/knxd:
Replace the line:
DAEMON_ARGS="-u /tmp/eib -u /var/run/knx -i -b ip:" with:
DAEMON_ARGS="-d /var/log/knxd.log -t 0xffe -f 9 -e 1.2.255 -E 1.1.10:30 -u /var/run/knx -i -b ncn5120:/dev/ttyMOD1 -D -T -R -S"
On WB6, with the new firmware version to run knxd correctly, you need to fix 2 files:
/etc/knxd.conf - replace the second line with: KNXD_OPTS="-t 0xffe -f 9 -e 1.1.255 -E 1.1.10:30 -b ncn5120:/dev/ttyMOD1 -D -T -R -S"
/lib/systemd/system/knxd.service - comment User and Group (write # as shown below) or remove these lines:
- User=knxd
- Group=knxd
after that, you should reboot the controller and everything should work
Decrypting keys:
| Key | Function |
|---|---|
| -d /var/log/knxd.log | to go into the background mode and write to a log. |
| -e 1.1.255 | assigns KNX-address knxd equal 1.1.255 as the IP gateway. |
| -E 1.1.10:30 | specifies knxd to issue KNX addresses to nodes from an IP network in the range of 1.1.10..1.1.30 |
| -u /var/run/knx | opens local Unix-socket |
| -t 0xffe | set the output mask of debug messages. |
| -f 9 | set max verbosity level |
| -i | specify listen to TCP-port (default 6720). It is possible to register -i 6721 or other port. Not exclusive alternative -u |
| -b ncn5120:/dev/ttyMOD1 | activate ncn5120 driver for port MOD1 (when installing the module into the extension slot MOD 2 it should be noted ttyMOD2) |
| -T -R | activate the gateway, tunnel mode (you need to work with ETS) |
| -D | says knxd to announce themselves (Discovery) in the network |
| -S | run the server (which responds to multicasts) |
More detailed:
knxd --help
Operation
To start KNX daemon, you need to write a line in the console: service knxd start
Restart if necessary: service knxd restart
To check the status: service knxd status
All logs are stored in the file /var/log/knxd.log
When you receive a message from the KNX device, the data is published to the MQTT topic /devices/knx/controls/data in Wiren Board 6.
To control KNX devices you need to send commands to MQTT topic /devices/knx/controls/data/on.
An example of a command:
mosquitto_pub -h 192.168.0.10 -p 1883 -t /devices/knx/controls/data/on -m "g:0/0/1 GroupValueWrite 0x01"
Where:
-h 192.168.0.10 - IP-address of the controller with KNX
-p 1883 - MQTT port
-t /devices/knx/controls/data/on - MQTT topic for uploading information
-m "g:0/0/1 GroupValueWrite 0x01" - message for a KNX device
Learn more about working with KNX data:wb-mqtt-knx (MQTT KNX Bridge)
Script for wb-rules упрощающий обработку телеграмм: knx_group_addresses.js
When working with ETS, it's Important: in “interfaces” ETS, it's necessary to choose the interface of the PC through which communication occurs. Requesting knxd b by unicast (host ip address with daemon) does not allow to program the devices. In the illustration, the arrow indicates which method of interaction with ETS works:
Also, if you are a user of Windows 8, 10, we advise you to disable antivirus and firewall, as they can interfere with the work of ETS.


