CAN/en: различия между версиями
Matveevrj (обсуждение | вклад) (Новая страница: «For more information see the «AmadeuS» wiki article «[http://www.armadeus.com/wiki/index.php?title=CAN_bus_Linux_driver CAN bus Linux driver]».») Метки: правка с мобильного устройства правка из мобильной версии |
Matveevrj (обсуждение | вклад) |
||
| (не показано 8 промежуточных версий этого же участника) | |||
| Строка 5: | Строка 5: | ||
[[Image:Can enable.png|300px|thumb|right|Setting the RS485-2 port to CAN mode and enabling the can driver in linux]] | [[Image:Can enable.png|300px|thumb|right|Setting the RS485-2 port to CAN mode and enabling the can driver in linux]] | ||
==== | ==== Через веб-интерфейс ==== | ||
Для настройки через веб-интерфейс нужно обновить пакет <code>wb-mqtt-confed</code> до версии 1.2.3+ | |||
Действия происходят в разделе '''Configs''' веб-интерфейса: | |||
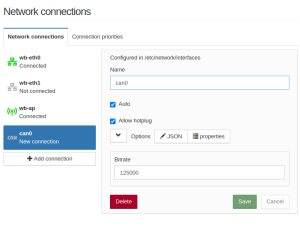
# | # На вкладке '''Network Interfaces''' добавьте новый интерфейс <code>can0</code> (см. скриншот). Нажмите кнопку '''Save'''. | ||
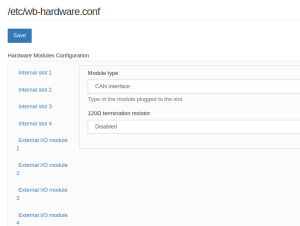
# | # Переключите порт <code>RS-485/CAN</code> в режим CAN: на вкладке '''Hardware Modules Configuration''' выберите настройки '''RS485-2/CAN interface config''', выберите в поле '''Module type''' «CAN interface» и нажмите кнопку '''Save'''. | ||
CAN-интерфейс будет подниматься сам при: | |||
* | * загрузке системы — за это отвечает сервис <code>wb-hwconf-manager</code>, | ||
* | * смене режима порта RS-485/2 в «CAN». | ||
==== | ==== Стандартными средствами linux (автоматически) ==== | ||
Раздел '''Network Interfaces''' веб-интерфейса — это обёртка вокруг файла <code>/etc/network/interfaces</code>, поэтому настройку CAN можно произвести с помощью службы управления сетями ОС debian. Для этого нужно: | |||
# | # Добавить в <code>/etc/network/interfaces</code> запись вида: | ||
#:<syntaxhighlight lang="bash"> | #:<syntaxhighlight lang="bash"> | ||
allow-hotplug can0 | allow-hotplug can0 | ||
| Строка 24: | Строка 24: | ||
bitrate 125000 | bitrate 125000 | ||
</syntaxhighlight> | </syntaxhighlight> | ||
# | # Переключить порт RS-485-2 в режим CAN | ||
Получим результат, аналогичный настройке через веб-интерфейс. | |||
==== | ==== Стандартными средствами linux (вручную) ==== | ||
После переключения порта в режим CAN, нужно выполнить: | |||
<syntaxhighlight lang="bash"> | <syntaxhighlight lang="bash"> | ||
ip link set can0 up type can bitrate 125000 | ip link set can0 up type can bitrate 125000 | ||
</syntaxhighlight> | </syntaxhighlight> | ||
== | == Работа с CAN == | ||
Утилиты <code>cansend</code> и <code>candump</code> есть в стандартном наборе ПО контроллера. Если по каким-то причинам их нет, можно поставить пакет <code>can-utils</code>: | |||
<syntaxhighlight lang="bash"> | <syntaxhighlight lang="bash"> | ||
apt update && apt install can-utils | apt update && apt install can-utils | ||
</syntaxhighlight> | </syntaxhighlight> | ||
Примеры команд: | |||
* | * Отправка четырех байт c адресом 123: | ||
*:<syntaxhighlight lang="bash"> | *:<syntaxhighlight lang="bash"> | ||
cansend can0 123#DEADBEEF | cansend can0 123#DEADBEEF | ||
</syntaxhighlight> | </syntaxhighlight> | ||
* | * Показывать входящие пакеты: | ||
*:<syntaxhighlight lang="bash"> | *:<syntaxhighlight lang="bash"> | ||
candump can0 | candump can0 | ||
</syntaxhighlight> | </syntaxhighlight> | ||
* | * Показать статистику: | ||
*:<syntaxhighlight lang="bash"> | *:<syntaxhighlight lang="bash"> | ||
cat /proc/net/can/stats | cat /proc/net/can/stats | ||
| Строка 58: | Строка 58: | ||
Обратите внимание, что в случае проблем на шине (нет терминатора, нет принимающего устройства, короткое замыкание), контроллер может прекратить работу. | |||
Для того чтобы начать работу вновь, выполните: | |||
<syntaxhighlight lang="bash"> | <syntaxhighlight lang="bash"> | ||
ifconfig can0 down && ip link set can0 up type can bitrate 125000 | ifconfig can0 down && ip link set can0 up type can bitrate 125000 | ||
</syntaxhighlight> | </syntaxhighlight> | ||
Больше информации смотрите в вики проекта «AmadeuS», статья «[http://www.armadeus.com/wiki/index.php?title=CAN_bus_Linux_driver CAN bus Linux driver]». | |||
Версия 22:55, 3 октября 2022
The work takes place through a standard Linux subsystem - SocketCAN. CAN ports are similar to network interfaces can0 or can1, depending on the controller model. For CAN to work on controllers up to version 6.7.x, you need a terminator jumper on the port. Starting from version 6.7.x, the terminator is controlled by software and turns on automatically.
Setting
Через веб-интерфейс
Для настройки через веб-интерфейс нужно обновить пакет wb-mqtt-confed до версии 1.2.3+
Действия происходят в разделе Configs веб-интерфейса:
- На вкладке Network Interfaces добавьте новый интерфейс
can0(см. скриншот). Нажмите кнопку Save. - Переключите порт
RS-485/CANв режим CAN: на вкладке Hardware Modules Configuration выберите настройки RS485-2/CAN interface config, выберите в поле Module type «CAN interface» и нажмите кнопку Save.
CAN-интерфейс будет подниматься сам при:
- загрузке системы — за это отвечает сервис
wb-hwconf-manager, - смене режима порта RS-485/2 в «CAN».
Стандартными средствами linux (автоматически)
Раздел Network Interfaces веб-интерфейса — это обёртка вокруг файла /etc/network/interfaces, поэтому настройку CAN можно произвести с помощью службы управления сетями ОС debian. Для этого нужно:
- Добавить в
/etc/network/interfacesзапись вида:allow-hotplug can0 iface can0 can static bitrate 125000
- Переключить порт RS-485-2 в режим CAN
Получим результат, аналогичный настройке через веб-интерфейс.
Стандартными средствами linux (вручную)
После переключения порта в режим CAN, нужно выполнить:
ip link set can0 up type can bitrate 125000
Работа с CAN
Утилиты cansend и candump есть в стандартном наборе ПО контроллера. Если по каким-то причинам их нет, можно поставить пакет can-utils:
apt update && apt install can-utils
Примеры команд:
- Отправка четырех байт c адресом 123:
cansend can0 123#DEADBEEF
- Показывать входящие пакеты:
candump can0
- Показать статистику:
cat /proc/net/can/stats
Обратите внимание, что в случае проблем на шине (нет терминатора, нет принимающего устройства, короткое замыкание), контроллер может прекратить работу.
Для того чтобы начать работу вновь, выполните:
ifconfig can0 down && ip link set can0 up type can bitrate 125000
Больше информации смотрите в вики проекта «AmadeuS», статья «CAN bus Linux driver».

