Метки: правка с мобильного устройства правка из мобильной версии |
|
| (не показано 8 промежуточных версий 2 участников) |
| Строка 1: |
Строка 1: |
| {{DISPLAYTITLE: 1-Wire in Wiren Board controllers }} | | <languages/>{{DISPLAYTITLE: 1-Wire in Wiren Board controllers }} |
| '''[https://wirenboard.com/en/product/1wire-DS18B20/ Buy DS18B20 1-Wire temperature sensor]''' | | '''[https://wirenboard.com/product/1wire-DS18B20/ Buy DS18B20 1-Wire Temperature Sensor]''' |
|
| |
|
| [[Image: ds18b20.jpg |300px|thumb|right| The most popular 1-Wire temperature sensor is the DS18B20, installed in a sealed housing. '''[https://wirenboard.com/en/product/1wire-DS18B20/ Buy]''' ]] | | [[Image: ds18b20.jpg |300px|thumb|right| The most popular 1-Wire temperature sensor is the DS18B20, installed in a sealed housing. '''[https://wirenboard.com/product/1wire-DS18B20/ Buy]''' ]] |
| == Connection == | | == Connect == |
| [[Image: WirenBoard+1-Wire.png | 200px|thumb|right| Connecting a 1-Wire Sensor to a Wiren Board Controller ]] | | [[Image: WirenBoard+1-Wire.png |200px| thumb|right| Connecting a 1-Wire Sensor to a Wiren Board Controller ]] |
| {{Wbincludes:1-Wire Network}} | | {{Wbincludes:1-Wire Network}} |
|
| |
|
| <div lang="ru" dir="ltr" class="mw-content-ltr">
| | == Software support == |
| == Поддержка в ПО ==
| | Sensor values are broadcast to the [[MQTT|MQTT]] message queue by the driver [https://github.com/wirenboard/wb-homa-w1 wb-mqtt-w1]. |
| Значения датчика транслируются в очередь сообщений [[MQTT|MQTT]] драйвером [https://github.com/wirenboard/wb-homa-w1 wb-mqtt-w1].
| |
| </div>
| |
|
| |
|
| <div lang="ru" dir="ltr" class="mw-content-ltr">
| |
| <gallery mode="traditional" widths ="400px" heights="250px"> | | <gallery mode="traditional" widths ="400px" heights="250px"> |
| Image: 1wire_mqtt.png | MQTT-топик и идентификатор датчика в разделе ''Settings'' веб-интерфейса | | Image: 1wire_mqtt.png | MQTT topic and sensor ID in the ''Settings'' section of the web interface |
| Image: Web-devices-1-wire.png | Показания датчика и его уникальный идентификатор на странице ''Devices'' веб-интерфейса | | Image: Web-devices-1-wire.png | Sensor readings and its unique identifier on the ''Devices'' page of the web interface |
| </gallery> | | </gallery> |
| </div>
| |
|
| |
|
| <div lang="ru" dir="ltr" class="mw-content-ltr">
| | After connecting the sensors to the controller, the values from the sensors will immediately appear in the [[Special:MyLanguage/Wiren Board Web Interface | Web Interface]]. If multiple sensors are connected to the controller, they will be distinguished by their identifiers. Identifiers are assigned to sensors at the factory, and contain device type, number and checksum. |
| После подключения датчиков к контроллеру значения с датчиков сразу появятся в [[Веб-интерфейс Wiren Board|веб-интерфейсе]]. Если к контроллеру подключены несколько датчиков, они будут различаться своими идентификаторами. Идентификаторы присваиваются датчикам на заводе, и содержат тип устройства, номер и контрольную сумму.
| | == Useful links == |
| == Полезные ссылки == | |
| </div>
| |
|
| |
|
| <div lang="ru" dir="ltr" class="mw-content-ltr">
| |
| {{Wbincludes:Device Page Footer}} | | {{Wbincludes:Device Page Footer}} |
| </div>
| |
Buy DS18B20 1-Wire Temperature Sensor
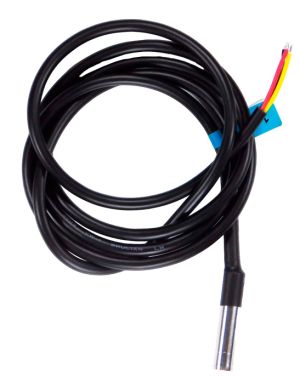
The most popular 1-Wire temperature sensor is the DS18B20, installed in a sealed housing.
BuyConnect
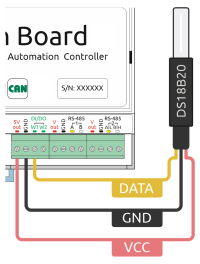
Connecting a 1-Wire Sensor to a Wiren Board Controller
The controller already has a 3 kΩ pull-up resistor between the data bus and VCC - no external resistor is needed.
Three wire connection
The sensor has three outputs. Their colors may vary from model to model, it is advisable to find the documentation for your model.
| Signal |
Terminal |
Color: Model 1 |
Color: Model 2 |
Color: Model 3
|
| Vdd (VCC, Power) |
+ 5V Out |
Red |
Red |
Red
|
| GND (ground) |
GND |
Black |
Black |
Yellow
|
| DQ (DATA, data ) |
1W |
Blue |
Yellow |
Green
|
Two-wire connection
Connect the power and ground pins of the sensor and connect them to the ground of the controller. With this connection, the sensor will take power from the data channel.
This method is not recommended, especially for connecting several sensors: the current from the data line may not be enough for all sensors, besides, polling slows down - time is spent on charging the internal capacitances of the sensors with voltage from the data line.
1-Wire busbar
The number of possible sensors and the reliability of their operation depends on the length of the bus, its topology and cable.
Typically, up to 20 sensors of 5 meters of cable connected in a star work reliably at home.
The main document when designing a bus is instructions from the 1-Wire developer. Main points:
- Bus length when connecting one sensor is up to 200 meters.
- When connecting several sensors, connect them to a 5 V supply (do not use a two-wire circuit).
- Laying a line with one bus is better than star laying.
- For laying a long bus or in conditions of increased interference (for example, in a shield) - use a twisted pair cable, for example, Cat 5, better shielded.
- Длина шины при подключении одного датчика до 200 метров.
- При подключении нескольких датчиков, подключайте их к питанию 5 В (не используйте двухпроводную схему).
- Прокладка линии одной шиной лучше, чем прокладка звездой.
- Для прокладывания длинной шины или в условиях повышенных помех (например, в щитке) — используйте витую пару, например, Cat 5, лучше экранированную.
A twisted-pair connection is a signal on one core of the pair, ground on the second, and similarly power supply: plus power on one core of the pair, minus on the second. Connect the power negative to signal ground. Connect the screen on one side to the minus power supply.
Software support
Sensor values are broadcast to the MQTT message queue by the driver wb-mqtt-w1.
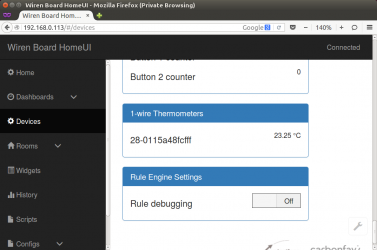
MQTT topic and sensor ID in the Settings section of the web interface
Sensor readings and its unique identifier on the Devices page of the web interface
After connecting the sensors to the controller, the values from the sensors will immediately appear in the Web Interface. If multiple sensors are connected to the controller, they will be distinguished by their identifiers. Identifiers are assigned to sensors at the factory, and contain device type, number and checksum.
Useful links
Поддерживаемые контроллером Wiren Board системы верхнего уровня, приложения, способы программирования, протоколы и устройства
| Протоколы
|
| Опрос датчиков и работа с устройствами (в базовой комплектации)
|
1-Wire • DLMS/COSEM • Modbus RTU/TCP Master • ГОСТ МЭК 61107 • СПОДЭС (ГОСТ Р 58940-2020)
|
| Опрос датчиков и работа с устройствами (с помощью модулей расширения)
|
KNX • eBUS • OpenTherm • Z-Wave • Zigbee
|
| Опрос контроллера из систем верхнего уровня и с других устройств
|
KNX • Modbus RTU/TCP Slave • MQTT • OPC UA • SNMP • Zabbix • МЭК 104 • SmartWeb (Гидролого)
|
| Системы верхнего уровня
|
| Системы мониторинга и SCADA
|
Grafana • Home Assistant • IntraHouse • IntraSCADA • Sprut.hub • MasterSCADA • Nagios • SimpLight SCADA • Rapid SCADA • SAYMON • Zabbix • iRidium Server
|
| Приложения
|
| Управление с телефона |
MQTT Dash • iRidium • Home Assistant • Apple Home • Дом с Алисой • Салют! Умный дом
|
| Голосовые помощники
|
Siri • Салют • Алиса
|
| Способы программирования
|
| Языки программирования ПЛК |
FBD, ST, LD, SFC (МЭК 61131-3)
|
| Визуальное программирование |
Node-RED
|
| Упрощённый текстовый движок правил
|
wb-rules
|
| Стандартное программирование
|
Python • C++ • Go • Node.js
|
| Протестированные устройства сторонних производителей
|
| Адаптеры протоколов
|
ECODim DALI GW2 • HDL KNX-DALI Gateway M/DALI.1 • Arlight DALI-LOGIC-LITE-PS-x1 • Lavritech L1 Lite LoRaWAN
|
| Аудиоресиверы сетевые
|
URRI A1
|
| Датчики климата
|
DS18B20 и клоны • Kvadro 1WIRE-RS485 • RLDA NL-3DPAS-M • RLDA NL-1S111 • Wellpro WP3066ADAM • Даджет MT8057/MT8057S • РД MSU21 • РД MSU24 • РД MSU34+TLP • РД MSU34+THLP • Эксис ИВТМ-7 М 3
|
| Датчики уровня
|
ЭСКОРТ ДБ-2
|
| Универсальные датчики
|
TESLiOT (BLE)
|
| Диммеры
|
DALI • Philio PAD07-RU • Uniel UCH-M131RC/0808 • Uniel UCH-M141RC/0808 • РД DDL04R • РД DDL24 • РД DDL84R-V • РД DDM845R
|
| Домофоны
|
VIZIT (ВИЗИТ), Элтис, Цифрал, Техком, Метаком, Beward и другие координатного типа
|
| Конвекторы
|
Varmann QTherm
|
| Кондиционеры
|
Haier YCJ-A002 • Z-Wave ИК-передатчик PAR01-RU • GREE (ONOKOM-AIR-GR-1-MB-B) • AUX (ONOKOM-AIR-AUX-1-MB-B) • Mitsubishi Electric (ONOKOM-AIR-ME-1-MB-B) • Daikin (ONOKOM-AIR-DK-1-MB-B) • Hisense (ONOKOM-AIR-HS-3-MB-B) • Haier (ONOKOM-AIR-HR-1-MB-B)
|
| Рекуператоры / вентиляция
|
Рекуператор VAKIO Base Smart • ПВУ Royal Clima Soffio Primo RCS-350-P • Komfovent • Royal Clima VENTO
|
| Контроллеры вентиляции и климата
|
Mautomatics JL204C5 (Breezart 550 Lux) • GTC (General Thermo Controllers) Syberia 5.0 • SystemAir VR 300 • Тепломаш КЭВ-БЛОК-МК
|
| Контроллеры холодильного оборудования
|
Carel BASIC(PYEZ)/EASY(PJEZ) • Danfoss EKC 204A1/AK-CC 210 • Danfoss EKC 202B • Danfoss EKC 202D • Danfoss ERC 211/ERC 213/ERC 214 • Eliwell IDPlus 974
|
| Метеостанции
|
Netatmo Urban Weather Station • Сокол-М
|
| Модули ввода-вывода
|
Wellpro WP8026ADAM • Wellpro WP8027ADAM • Wellpro WP8028ADAM • Wellpro WP9038ADAM
|
| Модули реле
|
РД DRB88 • Rubetek TZ78 • ICP DAS tM-P3R3 • ICP DAS LC-103 • Uniel UCH-M111RX/0808 • Uniel UCH-M121RX/0808
|
| Моторы для штор/Электрокарнизы
|
Akko AM82 • Dooya DM35EQ • Dooya DT82 • WinDeco • Somfy SDN • SunFlower KT82TV • Somfy RS485 RTS transmitter • Беспроводные Dooya/Somfy • Dauerhaft CM5 • Dauerhaft Roll 35/45 • A-OK AM68 (LM100) • A-OK AM35
|
| Панели управления
|
Cityron ПУ-3 (Modbus) • Sonoff NSPanel (fw NXPanel) • EKF PRO-Screen • Skirell Panel
|
| Системы защиты от протечек
|
KAPLESTOP • Ensystec Leak Protect
|
| Считыватели карт (для СКУД)
|
Wiegand
|
| Счётчики воды
|
Пульсар • Пульсар-М • Элехант СВД-15 • Элехант СВД-20 • Счётчики с импульсным выходом
|
| Счётчики тепла
|
Пульсар
|
| Счётчики электроэнергии
|
CSQ PD561Z-9SY • Peacefair PZEM-016 • Eastron SDM120M • Eastron SDM220M • Меркурий 200 • Меркурий 201 • Меркурий 203.2T • Меркурий 204 • Меркурий 206 • Меркурий 208 • Меркурий 230 • Меркурий 231 • Меркурий 234 • Меркурий 236 • Меркурий 238 • Милур 104 • Милур 105 • Милур 107 • Милур 305 • Милур 307 • Нева МТ 113 • Нева МТ 123 • Нева МТ 124 • Нева МТ 323 • Нева МТ 324 • Энергомера CE301 • Энергомера CE102M • Энергомера CE303 • Энергомера CE308
|
| Термостаты
|
BAC-002ALN • BAC-6000ALN • BAC-6000ELNW • BHT-6000 Series • Heatit Z-TEMP2 • Hessway • Siemens RDF302 • Ridan Greencon-R • Welrok az
|
| Увлажнители
|
CAREL Humisonic
|
| Управление двигателями (преобразователи частоты)
|
Vacon/Danfoss 10 • Danfoss VLT Microdrive FC51 • T13-400W-12-H/T13-750W-12-H
|
| Прочее
|
DIY • Shelly UNI • Tasmota • ESPHome
|
| Устройства с аналоговым или цифровым выходом
|
| Низковольтная нагрузка
|
Реле с управляющим напряжением 12–24 В • Светодиоды • Низковольтные вентиляторы • Низковольтные сигнальные лампы
|
| Датчики с аналоговым выходом
|
Датчики температуры, давления и другие, имеющие на выходе ток или напряжение
|
| Счётчики с импульсным выходом
|
Счётчики электроэнергии, воды, тепла и другие с импульсным выходом
|
| Устройства с выходом «открытый коллектор»
|
Устройства с выходом «открытый коллектор»
|
| Устройства с питанием 220 В
|
Лампы • Контакторы и другое оборудование с питанием от 220 В
|


![300px|thumb|right| The most popular 1-Wire temperature sensor is the DS18B20, installed in a sealed housing. '''[https://wirenboard.com/en/product/1wire-DS18B20/ Buy]'''](/wiki/%D0%A4%D0%B0%D0%B9%D0%BB:Ds18b20.jpg)