WBMZ2-BATTERY Backup Power Module/en: различия между версиями
FuzzyBot (обсуждение | вклад) м (FuzzyBot переименовал страницу WBMZ2-BATTERY/en в WBMZ2-BATTERY Backup Power Module/en без оставления перенаправления: Часть переводимой страницы WBMZ2-BATTERY.) |
FuzzyBot (обсуждение | вклад) (Обновление для соответствия новой версии исходной страницы.) |
||
| Строка 1: | Строка 1: | ||
<languages/> | <languages/> | ||
<div class="mw-translate-fuzzy"> | |||
[[File:WBMZ2_both_sides.png|750px|thumb|right|Backup | [[File:WBMZ2_both_sides.png|750px|thumb|right|Backup | ||
power supply module with LIR18650 battery, upper and lower side view]] | power supply module with LIR18650 battery, upper and lower side view]] | ||
'''[https://wirenboard.com/en/product/wbmz2-battery/ Purchase ]''' | '''[https://wirenboard.com/en/product/wbmz2-battery/ Purchase ]''' | ||
</div> | |||
<div class="mw-translate-fuzzy"> | |||
Battery module for[[Special:MyLanguage/Wiren Board 6|Wiren Board 6]] controllers. The module is an additional second level board installed in the controller case. It is used to maintain the operation of the controller and some connected modules in case of power loss. The module includes a battery, charge controller and power management circuit. | Battery module for[[Special:MyLanguage/Wiren Board 6|Wiren Board 6]] controllers. The module is an additional second level board installed in the controller case. It is used to maintain the operation of the controller and some connected modules in case of power loss. The module includes a battery, charge controller and power management circuit. | ||
</div> | |||
<div class="mw-translate-fuzzy"> | |||
== '''Warning:''' Switching on the controller with the installed module == | == '''Warning:''' Switching on the controller with the installed module == | ||
</div> | |||
<div class="mw-translate-fuzzy"> | |||
{| class="wikitable" style="float:right; margin-left: 10px;" | {| class="wikitable" style="float:right; margin-left: 10px;" | ||
| [[Файл:Buttons_on_off.png|500px|thumb|right|Controller power button: when the button '''is pressed''', the controller is '''turned off''', '''when not — it is on''']] | | [[Файл:Buttons_on_off.png|500px|thumb|right|Controller power button: when the button '''is pressed''', the controller is '''turned off''', '''when not — it is on''']] | ||
| Строка 19: | Строка 20: | ||
|- | |- | ||
|} | |} | ||
</div> | |||
<div class="mw-translate-fuzzy"> | |||
[[File:WB6_Open_Top_Cover.png|400px|thumb|right|You can open the top cover of the controller by inserting a screwdriver into the side slot]] | [[File:WB6_Open_Top_Cover.png|400px|thumb|right|You can open the top cover of the controller by inserting a screwdriver into the side slot]] | ||
</div> | |||
В контроллерах с установленным модулем WBMZ2-BATTERY включение и отключение осуществляется кнопкой на модуле. Ее можно нажать маленькой отверткой через отверстие в верхней крышке или сняв крышку. При первом включении может потребоваться до получаса для предварительной зарядки аккумулятора. | |||
=== Status light === | === Status light === | ||
<div class="mw-translate-fuzzy"> | |||
There is a green LED charge indicator on the module next to the on/off button. The indicator lights up when external power is applied to the module and the battery is charging. The indicator does not light if the controller is not supplied or the battery is fully charged. | There is a green LED charge indicator on the module next to the on/off button. The indicator lights up when external power is applied to the module and the battery is charging. The indicator does not light if the controller is not supplied or the battery is fully charged. | ||
</div> | |||
=== Установка в щите === | |||
Аккумулятор заряжается, только когда его температура находится в диапазоне от 0 °C до 45 °C. | |||
Не допускайте перегрева контроллера. Не устанавливайте рядом или над контакторами, реле, другим греющимся оборудованием. | |||
==Technical specifications== | ==Technical specifications== | ||
<div class="mw-translate-fuzzy"> | |||
<!--[[File:Mezonin.png|500px|thumb|right|Inserting module in the mezonin slot]]--> | <!--[[File:Mezonin.png|500px|thumb|right|Inserting module in the mezonin slot]]--> | ||
</div> | |||
<div class="mw-translate-fuzzy"> | |||
The module contains a charge circuit Li-Ion battery with charge protection at low and high temperatures. Battery capacity is 2200 mAh. Connection to the controller is carried out by two loops: power and control loop, and two-wire loop of on/off control. Charging current is 300 mA, the time required to fully charge the battery is ~7 hours. | The module contains a charge circuit Li-Ion battery with charge protection at low and high temperatures. Battery capacity is 2200 mAh. Connection to the controller is carried out by two loops: power and control loop, and two-wire loop of on/off control. Charging current is 300 mA, the time required to fully charge the battery is ~7 hours. | ||
</div> | |||
=== LIR18650-PCM battery parameters === | === LIR18650-PCM battery parameters === | ||
| Строка 88: | Строка 80: | ||
|} | |} | ||
<div class="mw-translate-fuzzy"> | |||
== Removing and installing the module == | |||
</div> | |||
If the battery module was purchased separately, you must connect the positive contact of the battery to the connector before installation, as shown in the figure. | |||
Installing the module is similar for WB5, which is described in detail in the topic: [[WBMZ-BATTERY - модуль резервного питания/en#Подключение модуля, идущего в комплекте с контроллером|Connecting the module that comes with the controller]]. | |||
<gallery mode="packed" heights="150px"> | |||
File:WBMZ2_insert_plus_wire.png|Подключите плюсовой контакт аккумулятора к клемме | |||
File:WBMZ2_Controller_Board_Connection.png|Подключение шлейфов модуля к плате контроллера | |||
File:WBMZ2_Module_Installed.png|Модуль установлен в верхней крышке контроллера; его удерживают защелки, обозначенные красным | |||
</gallery> | |||
== Конфигурирование == | |||
[[Файл:WBMZ2-BATTERY.PNG|400px|thumb|right|Виджет WBMZ2-BATTERY]] | |||
Настройка осуществляется в веб-интерфейсе. Раздел Configs => Hardware Modules Configuration. Слот '''Mezzanine board'''. Из списка необходимо выбрать '''wbmz2-battery'''. | |||
'''Важноː''' версия драйвера wb-hwconf-manager должна быть '''1.30.0''' или выше . Если это не так, обновите драйвер командойː | |||
'''apt-get update && apt-get install wb-hwconf-manager''' | |||
После настройки модуля в веб-интерфейсе, во вкладке '''Devices''' появится устройство "WBMZ2-BATTERY". | |||
'''Charge''' - Текущий объем заряда аккумулятора (мАч) | |||
''' Current''' - Ток (А). Положительное значение - батарея заряжается, Отрицательное - батарея разряжается. | |||
'''Percentage''' - Процент заряда аккумулятора (от вычисленного при калибровке объема). | |||
'''Temperature''' - Температура модуля WBMZ2-BATTERY. | |||
'''Voltage''' - Напряжение аккумулятора. | |||
'''Reset''' - Сброс калибровочных значений на 0. | |||
== Калибровка == | |||
<!--T:24--> | |||
При первоначальной настройке значения '''Charge''' и '''Percentage''' будут показывать неверные значения. Для их калибровкиː | |||
#Сбросьте калибровочные значения на 0, нажав кнопку Reset (см. скриншот выше) в веб-интерфейсе. | |||
#Отключите внешнее питание, но оставьте контроллер включенным до полной разрядки аккумулятора. ''После того, как аккумулятор будет полностью разряжен, контроллер отключится.'' | |||
#Подключите внешнее питание к контроллеру и полностью зарядите батарею. ''Значение ''' Current''' в момент полной зарядки будет - c небольшими отклонениями - около 0: в пределах от -0.005 до 0.005.'' | |||
#Калибровка закончена. | |||
== Известные неисправности и особенности работы == | |||
=== ERRMZBAT01: Прерывистая зарядка аккумулятора или отсутствие зарядки аккумулятора при повышенных температурах === | |||
'''Подверженные устройства''' | |||
Все устройства до партии v2.8.3B/R | |||
'''Описание''' | |||
Порог отключения зарядки - 45 ± 3С. Контроллер дополнительно греет аккумуляторный модуль на 10-15 градусов. Аккумулятор заряжается линейной зарядкой и плата дополнительно греется, при достижении порога заряд прекращается. Через несколько минут плата остывает, и цикл начинается заново. Время заряда аккумулятора увеличивается. | |||
Если же температура в корпусе контроллера постоянно превышает пороговую, то аккумулятор не заряжается вовсе. | |||
'''Пути обхода''' | |||
Не устанавливать рядом и над "горячим" оборудованием. | |||
'''Запланированное исправление''' | |||
В партиях начиная с v2.8.3B/R порог поднят до 60 ± 3С. | |||
== Ревизии устройства == | |||
{{Wbincludes:Revision}} | |||
|- | |||
|2.8.3 | |||
|v2.8.3B/R | |||
|07.2020 - ... | |||
| | |||
*Увеличен температурный диапазон при заряде (см. ERRMZBAT01) | |||
|- | |||
|2.8.2 | |||
|v2.8.2A | |||
|07.2020 | |||
| | |||
*Партия с призматическими аккумуляторами | |||
|- | |||
|2.8.2 - 2.8.3 | |||
|v2.8.2A - v2.8.2G, v2.8.3A - v2.8.3B | |||
|06.2019 - 07.2020 | |||
| | |||
*Изменена компоновка платы, без изменений для пользователя | |||
|- | |||
|2.8 | |||
|296, 304 | |||
|01.2019 - 05.2019 | |||
| | |||
*Первая версия, с цилиндрическими аккумуляторами | |||
|- | |||
|} | |||
Версия 20:59, 29 августа 2022

Battery module forWiren Board 6 controllers. The module is an additional second level board installed in the controller case. It is used to maintain the operation of the controller and some connected modules in case of power loss. The module includes a battery, charge controller and power management circuit.
Warning: Switching on the controller with the installed module


В контроллерах с установленным модулем WBMZ2-BATTERY включение и отключение осуществляется кнопкой на модуле. Ее можно нажать маленькой отверткой через отверстие в верхней крышке или сняв крышку. При первом включении может потребоваться до получаса для предварительной зарядки аккумулятора.
Status light
There is a green LED charge indicator on the module next to the on/off button. The indicator lights up when external power is applied to the module and the battery is charging. The indicator does not light if the controller is not supplied or the battery is fully charged.
Установка в щите
Аккумулятор заряжается, только когда его температура находится в диапазоне от 0 °C до 45 °C.
Не допускайте перегрева контроллера. Не устанавливайте рядом или над контакторами, реле, другим греющимся оборудованием.
Technical specifications
The module contains a charge circuit Li-Ion battery with charge protection at low and high temperatures. Battery capacity is 2200 mAh. Connection to the controller is carried out by two loops: power and control loop, and two-wire loop of on/off control. Charging current is 300 mA, the time required to fully charge the battery is ~7 hours.
LIR18650-PCM battery parameters
| Type | Li-ion |
| Rated voltage | 3,7 V |
| Rated capacity (C) | 2200 mAh |
| Maximum charge/discharge current | 4.4A |
| Charging time | 0,5 C— 5 hours
1 C — 2,5 hours; |
| charging voltage | 4,2 В |
| Operating temperature | Charge: 0°C to 45°C
Discharge: -20°C to 60°C |
| Storage temperature | -5°C to 35°C |
Removing and installing the module
If the battery module was purchased separately, you must connect the positive contact of the battery to the connector before installation, as shown in the figure.
Installing the module is similar for WB5, which is described in detail in the topic: Connecting the module that comes with the controller.
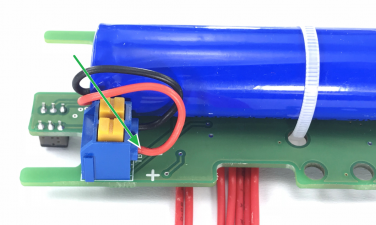
Подключите плюсовой контакт аккумулятора к клемме
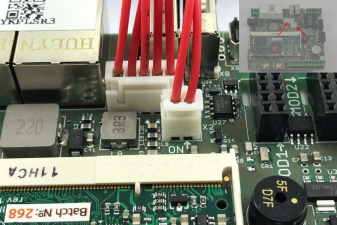
Подключение шлейфов модуля к плате контроллера
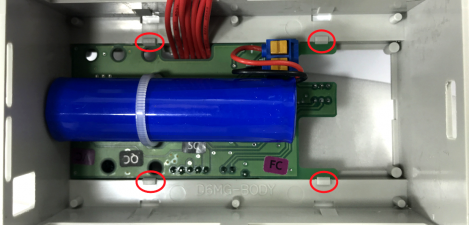
Модуль установлен в верхней крышке контроллера; его удерживают защелки, обозначенные красным


Конфигурирование

Настройка осуществляется в веб-интерфейсе. Раздел Configs => Hardware Modules Configuration. Слот Mezzanine board. Из списка необходимо выбрать wbmz2-battery.
Важноː версия драйвера wb-hwconf-manager должна быть 1.30.0 или выше . Если это не так, обновите драйвер командойː
apt-get update && apt-get install wb-hwconf-manager
После настройки модуля в веб-интерфейсе, во вкладке Devices появится устройство "WBMZ2-BATTERY".
Charge - Текущий объем заряда аккумулятора (мАч)
Current - Ток (А). Положительное значение - батарея заряжается, Отрицательное - батарея разряжается.
Percentage - Процент заряда аккумулятора (от вычисленного при калибровке объема).
Temperature - Температура модуля WBMZ2-BATTERY.
Voltage - Напряжение аккумулятора.
Reset - Сброс калибровочных значений на 0.
Калибровка
При первоначальной настройке значения Charge и Percentage будут показывать неверные значения. Для их калибровкиː
- Сбросьте калибровочные значения на 0, нажав кнопку Reset (см. скриншот выше) в веб-интерфейсе.
- Отключите внешнее питание, но оставьте контроллер включенным до полной разрядки аккумулятора. После того, как аккумулятор будет полностью разряжен, контроллер отключится.
- Подключите внешнее питание к контроллеру и полностью зарядите батарею. Значение Current в момент полной зарядки будет - c небольшими отклонениями - около 0: в пределах от -0.005 до 0.005.
- Калибровка закончена.
Известные неисправности и особенности работы
ERRMZBAT01: Прерывистая зарядка аккумулятора или отсутствие зарядки аккумулятора при повышенных температурах
Подверженные устройства
Все устройства до партии v2.8.3B/R
Описание
Порог отключения зарядки - 45 ± 3С. Контроллер дополнительно греет аккумуляторный модуль на 10-15 градусов. Аккумулятор заряжается линейной зарядкой и плата дополнительно греется, при достижении порога заряд прекращается. Через несколько минут плата остывает, и цикл начинается заново. Время заряда аккумулятора увеличивается. Если же температура в корпусе контроллера постоянно превышает пороговую, то аккумулятор не заряжается вовсе.
Пути обхода
Не устанавливать рядом и над "горячим" оборудованием.
Запланированное исправление
В партиях начиная с v2.8.3B/R порог поднят до 60 ± 3С.
Ревизии устройства
The batch number can be found on a sticker on the side of the case or on the PCB.
| Revision | Batch | Release date | Differences from previous revision |
|---|---|---|---|
| 2.8.3 | v2.8.3B/R | 07.2020 - ... |
|
| 2.8.2 | v2.8.2A | 07.2020 |
|
| 2.8.2 - 2.8.3 | v2.8.2A - v2.8.2G, v2.8.3A - v2.8.3B | 06.2019 - 07.2020 |
|
| 2.8 | 296, 304 | 01.2019 - 05.2019 |
|