Installing Node-RED on a Wiren Board controller

Description
Node-RED is a visual programming tool based on Node.js and developed and maintained by an open community.
A detailed description, instructions and examples of use can be found on the site nodered.org, and community support in the telegram channel Node-RED.
Copy the commands from the instructions, paste them into controller console using the Shift+Insert keys and run with the Enter key. In case of errors, carefully read the output, there will be instructions and hints.
Installation
To install Node-RED 2.2 on a Wiren Board controller, connect to it via SSH and enter a few commands into the console.
Install the necessary components:
apt update && apt install -y nodejs git make g++ gcc build-essential
Run the Node-RED installation:
npm install -g --unsafe-perm node-red@2.2
If you need to upgrade your Node-RED version, run the install command again.
Creating a project
To autostart Node-RED, you need to configure the service. To do this, in the /etc/systemd/system/ folder, create the nodered.service file:
mcedit /etc/systemd/system/nodered.service
Then paste the lines into this file:
[Unit]
Description=Node-RED graphical event wiring tool
Wants=network.target

[Service]
Type=simple
User=root
Group=root
WorkingDirectory=/home

Nice=5
Environment="NODE_OPTIONS=--max_old_space_size=256"
ExecStart=/usr/bin/env node-red $NODE_OPTIONS $NODE_RED_OPTIONS
KillSignal=SIGINT
Restart=on-failure
SyslogIdentifier=Node-RED

[Install]
WantedBy=multi-user.target
Save changes and close the file. Now enable the service and start it with the command:
systemctl enable nodered && systemctl start nodered
Check the status of the service with the command, the output should contain the line Active: active (running):
# systemctl status nodered
● nodered.service - Node-RED graphical event wiring tool
   Loaded: loaded (/etc/systemd/system/nodered.service; enabled; vendor preset: enabled)
   Active: active (running) since Fri 2021-12-03 06:32:25 UTC; 24s ago
 Main PID: 2757 (node)
   CGroup: /system.slice/nodered.service
           └─2757 node /usr/bin/node-red --max_old_space_size=256

Dec 03 06:32:25 wirenboard-AWQBNTYP systemd[1]: Started Node-RED graphical event wiring tool.
Dec 03 06:32:36 wirenboard-AWQBNTYP Node-RED[2757]: 3 Dec 06:32:36 - [info]
Dec 03 06:32:36 wirenboard-AWQBNTYP Node-RED[2757]: Welcome to Node-RED
Dec 03 06:32:36 wirenboard-AWQBNTYP Node-RED[2757]: ===================
Dec 03 06:32:36 wirenboard-AWQBNTYP Node-RED[2757]: 3 Dec 06:32:36 - [info] Node-RED version: v2.1.4
Dec 03 06:32:36 wirenboard-AWQBNTYP Node-RED[2757]: 3 Dec 06:32:36 - [info] Node.js  version: v12.19.0
Dec 03 06:32:36 wirenboard-AWQBNTYP Node-RED[2757]: 3 Dec 06:32:36 - [info] Linux 5.10.35-wb6 arm LE
Dec 03 06:32:41 wirenboard-AWQBNTYP Node-RED[2757]: 3 Dec 06:32:41 - [info] Loading palette nodes
Delete
If you no longer need Node-RED, then you can remove it:
- Stop, disable and remove the service:
systemctl stop nodered && systemctl disable nodered && rm /etc/systemd/system/nodered.service
- Remove Node-RED:
npm -g remove node-red && npm -g remove node-red-admin && rm -R ~/.node-red
Node.js can also be removed, but make sure you don't have other programs installed that use it, such as zigbee2mqtt. To remove node.js run the command:
apt remove nodejs
Node-RED Web Interface
After starting the service, open a browser and enter the address of your controller on the network and port 1880. For example: http://192.168.42.1:1880
Instructions for working with Node-RED can be found at site nodered.org
WB Nodes


To simplify the interaction of Node-RED with the Wiren Board controller, the user Andrej_Popov wrote the module node-red-contrib-wirenboard.
Installation
Install it via Node-RED web-interface:
- Log into the Node-RED web-interface.
- In the upper right corner, open the menu.
- In the window that opens, select the Palette Management tab.
- Go to the Install tab, type wirenboard into the search field and press Enter on your keyboard.
- Install the package named node-red-contrib-wirenboard.
- Close the settings window. Module installation completed.
After installation, the Wiren Board section will appear in the left panel.
Setting
After you have installed WB Nodes, you need to set up a connection to the MQTT broker of the Wiren Board controller:
- Add a WB-input node to the workspace, which is located in the left panel, in the Wiren Board section.
- Double click on it, the Edit in node window will open.
- Find the field Server and click on the pencil button. The Add new wirenboard-server config node window will open.
- Fill in the Name, Host and MQTT Port fields. If Node-RED is installed on the controller, enter
localhostin the Host field. Enter an arbitrary name in the Name field, and 1883 in the MQTT Port field. - Save the server settings by clicking on the Done button.
- Close the Edit in node window by clicking on Cancel.
After setting up the connection, apply the server setting by clicking the Deploy button on the top right. Only after that the list of channels of the Wiren Board controller will be available.
You have set up WB Nodes and can write automations using Node-RED.
Checking settings
To check if the settings are correct:
- Add any node from the Wiren Board group to the workspace, for example, WB-input.
- Double click on the WB-input node, the Edit in node window will open.
- In the Edit in node window, click the Refresh Device List button.
If the connection is configured correctly, then the drop-down list of the Сhannel field will display a list of channels available for use.
Examples
WB-Nodes comes with examples for Apple HomeKit and Yandex.Alice, you can find them in Menu → Import → Examples.
- Examples from WB-Nodes
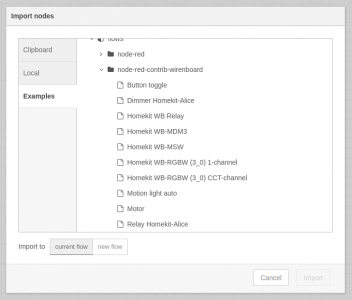
List of examples
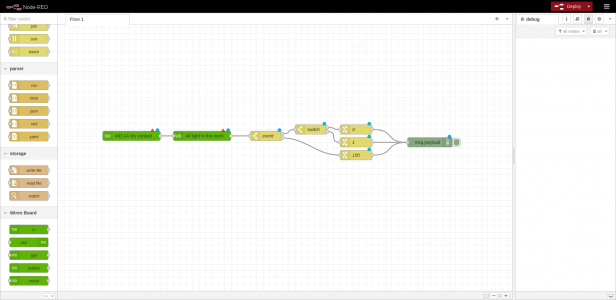
Example in workspace


Using the mqtt in and mqtt out nodes to interact with the Wiren Board
Connection setup

An alternative is to use the mqtt in and mqtt out nodes. To do this, you need the addresses of the topics, you can get them in the controller web interface on the MQTT-channels page.
To set up an MQTT connection in Node-RED, follow these steps:
- Drag the mqtt in node to the workspace.
- Enter the node configuration and click on the Pencil next to the Server field.
- On the Connecting tab, set the broker address and port number.
- In the Name field, enter any server name.
- On the Security tab, you can specify the Username and Password to connect to the broker. If the Wiren Board controller acts as a broker, this field must be left blank.
- After filling in all the fields, click the Update button. The created broker can now be used to set up all connections.
- Select the created broker from the list in the Server field.
- Enter mqtt-topic address in the Topic field.
- Press the Done button.
The mqtt out node is configured according to the same principle.
- Configuring MQTT Broker (Server)
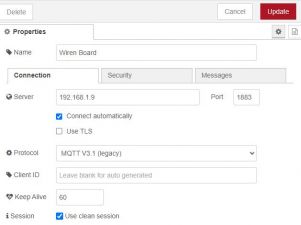
Connecting tab
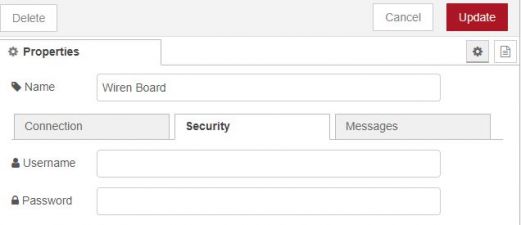
Tab Security


Sending commands
The mqtt out node is used to send a command to the controller via MQTT. In this case, the Topic field specifies the address of the mqtt-topic of the controller, in which the parameter must be written. Please note that at the end of the node address mqtt out you need to write /on, otherwise the parameter will not be written to the topic. For example, /devices/wb-mrgbw-d-fw3_129/controls/RGB Strip/on. Read more on the MQTT.
- Configuring nodes to work with MQTT
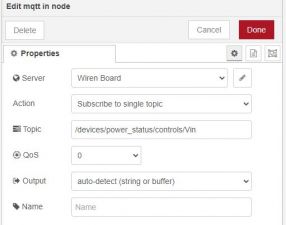
mqtt in node configuration example
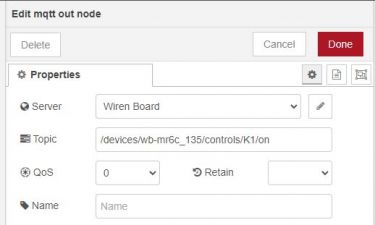
mqtt out node setup example
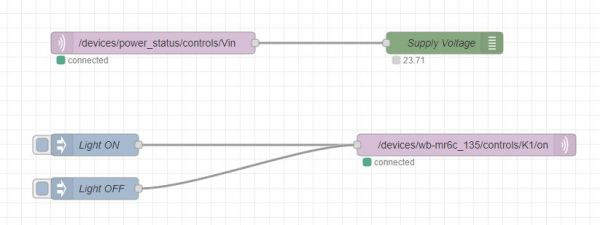
Communication via MQTT in Node-Red


To send a parameter to the mqtt out node, you can use the inject node.
- Drag the inject node to the workspace.
- Connect it to the input of the mqtt out node.
- Go to the settings of the inject node and set the Name of the node, the Variable Type and its Value. Click the Done button.
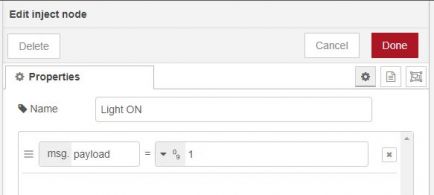
An example of inject node settings for controlling a discrete parameter
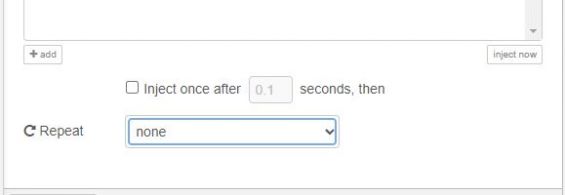
inject node retry period setting field


An example of using the inject node

After setting up input and output, you can process data inside Node-RED and set up the use of third-party services, for example, Smart home with Alice.

Alice control example

Usage examples
Examples of using Node-RED with WB-Nodes on Wiren Board controllers: