Node-RED/en: различия между версиями
Matveevrj (обсуждение | вклад) |
Matveevrj (обсуждение | вклад) (Новая страница: «You have set up WB Nodes and can write automations using Node-RED.») |
||
| (не показано 14 промежуточных версий этого же участника) | |||
| Строка 110: | Строка 110: | ||
[[File:Installing node-red-contrib-wirenboard.PNG|500px|thumb|right| Installing WB Nodes on a Wiren Board Controller]] | [[File:Installing node-red-contrib-wirenboard.PNG|500px|thumb|right| Installing WB Nodes on a Wiren Board Controller]] | ||
[[Image: nr+wb-settings.png |600px|thumb|right|Configuring the connection to the Wiren Board controller]] | [[Image: nr+wb-settings.png |600px|thumb|right|Configuring the connection to the Wiren Board controller]] | ||
To simplify the interaction of Node-RED with the Wiren Board controller, the user [https://support.wirenboard.com/t/node-red-contrib-wirenboard/2019 Andrej_Popov] wrote the module <code>node-red-contrib-wirenboard</code>. | To simplify the interaction of Node-RED with the Wiren Board controller, the user [https://support.wirenboard.com/t/node-red-contrib-wirenboard/2019 Andrej_Popov] wrote the module <code>node-red-contrib-wirenboard</ code>. | ||
=== Installation === | === Installation === | ||
Install it via Node-RED web | Install it via [[#Node-RED Web Interface | Node-RED web interface]]: | ||
{{Node-RED | {{Node-RED Install plugin | ||
|search= | |search=wireboard | ||
|name= node-red-contrib-wirenboard | |name=node-red-contrib-wirenboard | ||
}} | }} | ||
| Строка 133: | Строка 132: | ||
You have set up WB Nodes and can write automations using Node-RED. | You have set up WB Nodes and can write automations using Node-RED. | ||
=== | === Проверка настроек === | ||
Чтобы проверить правильность настроек: | |||
# | # Добавьте в рабочую область любую ноду из группы Wiren Board, например, '''WB-input'''. | ||
# | # Дважды кликните на ноде '''WB-input''', откроется окно '''Edit in node'''. | ||
# | # В окне '''Edit in node''' нажмите кнопку '''Refresh Device List'''. | ||
Если соединение настроено верно, то в выпадающем списке поля '''Сhannel''' появится список доступных для использования каналов. | |||
=== | === Примеры === | ||
WB-Nodes | В комплекте с WB-Nodes есть примеры для [[Node-RED Apple HomeKit | Apple HomeKit]] и Яндекс.Алисы, найти их можно в '''Menu''' → '''Import''' → '''Examples'''. | ||
<gallery mode="packed" heights="200px" caption=" | <gallery mode="packed" heights="200px" caption="Примеры из комплекта WB-Nodes"> | ||
Image: WB-Nodes Examples 1.png | | Image: WB-Nodes Examples 1.png | Список примеров | ||
Image: WB-Nodes Examples 2.png | | Image: WB-Nodes Examples 2.png | Пример в рабочей области | ||
</gallery> | </gallery> | ||
== | == Использование нод ''mqtt in'' и ''mqtt out'' для взаимодействия с Wiren Board == | ||
=== | === Настройка подключения === | ||
[[Image: NodeRed_mqtt_nodes.jpg |300px|thumb|right| MQTT | [[Image: NodeRed_mqtt_nodes.jpg |300px|thumb|right| Ноды MQTT в Node-Red ]] | ||
Альтернативный вариант — использовать ноды '''mqtt in''' и '''mqtt out'''. Для этого вам понадобятся адреса топиков, взять их можно в веб-интерфейсе контроллера на странице [[Wiren Board Web Interface#mqtt-channels |MQTT-каналы]]. | |||
Для настройки MQTT-соединения в Node-RED выполните следующие действия: | |||
# | #Перетащите ноду '''mqtt in''' в рабочую область. | ||
# | #Войдите в конфигурацию ноды и нажмите на '''Карандаш''' напротив поля '''Server'''. | ||
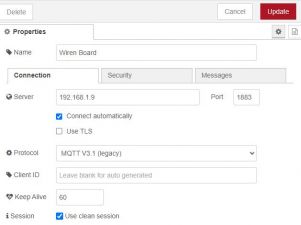
# | #На вкладке '''Connecting''' задайте адрес брокера и номер порта. | ||
#: | #:В поле '''Name''' введите любое имя сервера. | ||
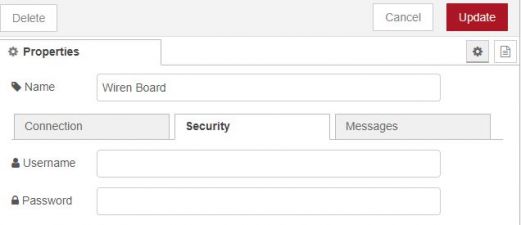
#: | #:На вкладке '''Security''' можно указать Имя пользователя и Пароль для подключения к брокеру. Если в качестве брокера выступает контроллер Wiren Board, это поле нужно оставить пустым. | ||
# | #После заполнения всех полей нажмите кнопку '''Update'''. Созданный брокер теперь можно использовать для настройки всех подключений. | ||
# | #Выберите созданные брокер из списка в поле '''Server'''. | ||
# | #Введите адрес mqtt-топика в поле '''Topic'''. | ||
# | #Нажмите кнопку '''Done'''. | ||
По такому же принципу настраивается нода '''mqtt out'''. | |||
<gallery mode="packed" heights="150px" caption=" | <gallery mode="packed" heights="150px" caption="Настройка MQTT-брокера (Server)> | ||
Image: NodeRed_mqtt2.jpg | ''Connecting'' | Image: NodeRed_mqtt2.jpg | Вкладка ''Connecting'' | ||
Image: NodeRed_mqtt3.jpg | | Image: NodeRed_mqtt3.jpg | Вкладка ''Security'' | ||
</gallery> | </gallery> | ||
=== | === Отправка команд === | ||
Для отправки команды контроллеру по MQTT используется нода '''mqtt out'''. При этом в поле '''Topic''' указывается адрес mqtt-топика контроллера, в который необходимо записать параметр. Нужно учитывать, что в конце адреса ноды '''mqtt out''' нужно написать <code>/on</code>, иначе параметр в топик не запишется. Например, <code>/devices/wb-mrgbw-d-fw3_129/controls/RGB Strip/on</code>. Подробнее читайте на странице [[MQTT | MQTT]]. | |||
<gallery mode="packed" heights="150px" caption=" | <gallery mode="packed" heights="150px" caption="Настройка нод для работы с MQTT"> | ||
Image: NodeRed_mqtt4.jpg | '''mqtt in''' | Image: NodeRed_mqtt4.jpg | Пример настройки ноды '''mqtt in''' | ||
Image: mqtt_out_no.jpg | '''mqtt out''' | Image: mqtt_out_no.jpg | Пример настройки ноды '''mqtt out''' | ||
Image: NodeRed_mqtt1.jpg | | Image: NodeRed_mqtt1.jpg | Обмен данными через MQTT в Node-Red | ||
</gallery> | </gallery> | ||
Для отправки параметра в ноду '''mqtt out''' можно использовать ноду '''inject'''. | |||
# | #Перетащите ноду '''inject''' в рабочую область. | ||
# | #Подключите ее ко входу ноды '''mqtt out'''. | ||
# | #Зайдите в настройки ноды '''inject''' и задайте ''Имя'' ноды, ''Тип переменной'' и ее ''Значение''. Нажмите кнопку '''Done'''. | ||
<gallery mode="packed" heights="130px"> | <gallery mode="packed" heights="130px"> | ||
Image: Inject1.jpg | | Image: Inject1.jpg | Пример настроек ноды '''inject''' для управления дискретным параметром | ||
Image: Inject2.jpg | '''inject''' | Image: Inject2.jpg | Поле настройки периодов повторения отправки ноды '''inject''' | ||
</gallery> | </gallery> | ||
<gallery mode="packed" heights="100px"> | <gallery mode="packed" heights="100px"> | ||
Image: Node_inject.jpg | | Image: Node_inject.jpg | Пример использования ноды '''inject''' | ||
</gallery> | </gallery> | ||
После настройки ввода и вывода можно обрабатывать данные внутри Node-RED и настроить использование сторонних сервисов, например, [[Node-RED_Alice | Умный дом с Алисой]]. | |||
<gallery mode="packed" heights="150px"> | <gallery mode="packed" heights="150px"> | ||
Image: NodeRed_mqtt5.jpg | | Image: NodeRed_mqtt5.jpg | Пример управления с помощью Алисы | ||
</gallery> | </gallery> | ||
== | == Примеры использования == | ||
Примеры использования Node-RED с WB-Nodes на контроллерах Wiren Board: | |||
* [[Node-RED_Telegram | Telegram | * [[Node-RED_Telegram | Настройка Telegram-бота]]. | ||
* [[Node-RED_Alice | | * [[Node-RED_Alice | Настройка Алисы на контроллере Wiren Board]]. | ||
* [[Node-RED Apple HomeKit | | * [[Node-RED Apple HomeKit | Настройка Apple HomeKit на контроллере Wiren Board]]. | ||
* [[Node-RED Dashboards| | * [[Node-RED Dashboards|Создание панелей (Dashboards) в Node-RED]]. | ||
* [https://youtu.be/cKQmU4LZo4c | * [https://youtu.be/cKQmU4LZo4c Видео от нашего партнёра: Wiren Board + Node-RED] | ||
Версия 21:34, 20 октября 2022

Description
Node-RED is a visual programming tool based on Node.js and developed and maintained by an open community.
A detailed description, instructions and examples of use can be found on the site nodered.org, and community support in the telegram channel Node-RED.
Copy the commands from the instructions, paste them into controller console using the Shift+Insert keys and run with the Enter key. In case of errors, carefully read the output, there will be instructions and hints.
Installation
To install Node-RED 2.2 on a Wiren Board controller, connect to it via SSH and enter a few commands into the console.
Install the necessary components:
apt update && apt install -y nodejs git make g++ gcc build-essential
Run the Node-RED installation:
npm install -g --unsafe-perm node-red@2.2
If you need to upgrade your Node-RED version, run the install command again.
Creating a project
To autostart Node-RED, you need to configure the service. To do this, in the /etc/systemd/system/ folder, create the nodered.service file:
mcedit /etc/systemd/system/nodered.service
Then paste the lines into this file:
[Unit]
Description=Node-RED graphical event wiring tool
Wants=network.target

[Service]
Type=simple
User=root
Group=root
WorkingDirectory=/home

Nice=5
Environment="NODE_OPTIONS=--max_old_space_size=256"
ExecStart=/usr/bin/env node-red $NODE_OPTIONS $NODE_RED_OPTIONS
KillSignal=SIGINT
Restart=on-failure
SyslogIdentifier=Node-RED

[Install]
WantedBy=multi-user.target
Save changes and close the file. Now enable the service and start it with the command:
systemctl enable nodered && systemctl start nodered
Check the status of the service with the command, the output should contain the line Active: active (running):
# systemctl status nodered
● nodered.service - Node-RED graphical event wiring tool
   Loaded: loaded (/etc/systemd/system/nodered.service; enabled; vendor preset: enabled)
   Active: active (running) since Fri 2021-12-03 06:32:25 UTC; 24s ago
 Main PID: 2757 (node)
   CGroup: /system.slice/nodered.service
           └─2757 node /usr/bin/node-red --max_old_space_size=256

Dec 03 06:32:25 wirenboard-AWQBNTYP systemd[1]: Started Node-RED graphical event wiring tool.
Dec 03 06:32:36 wirenboard-AWQBNTYP Node-RED[2757]: 3 Dec 06:32:36 - [info]
Dec 03 06:32:36 wirenboard-AWQBNTYP Node-RED[2757]: Welcome to Node-RED
Dec 03 06:32:36 wirenboard-AWQBNTYP Node-RED[2757]: ===================
Dec 03 06:32:36 wirenboard-AWQBNTYP Node-RED[2757]: 3 Dec 06:32:36 - [info] Node-RED version: v2.1.4
Dec 03 06:32:36 wirenboard-AWQBNTYP Node-RED[2757]: 3 Dec 06:32:36 - [info] Node.js  version: v12.19.0
Dec 03 06:32:36 wirenboard-AWQBNTYP Node-RED[2757]: 3 Dec 06:32:36 - [info] Linux 5.10.35-wb6 arm LE
Dec 03 06:32:41 wirenboard-AWQBNTYP Node-RED[2757]: 3 Dec 06:32:41 - [info] Loading palette nodes
Delete
If you no longer need Node-RED, then you can remove it:
- Stop, disable and remove the service:
systemctl stop nodered && systemctl disable nodered && rm /etc/systemd/system/nodered.service
- Remove Node-RED:
npm -g remove node-red && npm -g remove node-red-admin && rm -R ~/.node-red
Node.js can also be removed, but make sure you don't have other programs installed that use it, such as zigbee2mqtt. To remove node.js run the command:
apt remove nodejs
Node-RED Web Interface
After starting the service, open a browser and enter the address of your controller on the network and port 1880. For example: http://192.168.42.1:1880
Instructions for working with Node-RED can be found at site nodered.org
WB Nodes


To simplify the interaction of Node-RED with the Wiren Board controller, the user Andrej_Popov wrote the module node-red-contrib-wirenboard</ code>.
Installation
Install it via  Node-RED web interface:
Шаблон:Node-RED Install plugin
After installation, the Wiren Board section will appear in the left panel.
Setting
After you have installed WB Nodes, you need to set up a connection to the MQTT broker of the Wiren Board controller:
- Add a WB-input node to the workspace, which is located in the left panel, in the Wiren Board section.
- Double click on it, the Edit in node window will open.
- Find the field Server and click on the pencil button. The Add new wirenboard-server config node window will open.
- Fill in the Name, Host and MQTT Port fields. If Node-RED is installed on the controller, enter
localhost in the Host field. Enter an arbitrary name in the Name field, and 1883 in the MQTT Port field.
- Save the server settings by clicking on the Done button.
- Close the Edit in node window by clicking on Cancel.
 After setting up the connection, apply the server setting by clicking the Deploy button on the top right. Only after that the list of channels of the Wiren Board controller will be available.
You have set up WB Nodes and can write automations using Node-RED.
Проверка настроек
Чтобы проверить правильность настроек:
- Добавьте в рабочую область любую ноду из группы Wiren Board, например, WB-input.
- Дважды кликните на ноде WB-input, откроется окно Edit in node.
- В окне Edit in node нажмите кнопку Refresh Device List.
Если соединение настроено верно, то в выпадающем списке поля Сhannel появится список доступных для использования каналов.
Примеры
В комплекте с WB-Nodes есть примеры для Apple HomeKit и Яндекс.Алисы, найти их можно в Menu → Import → Examples.
- Примеры из комплекта WB-Nodes
-
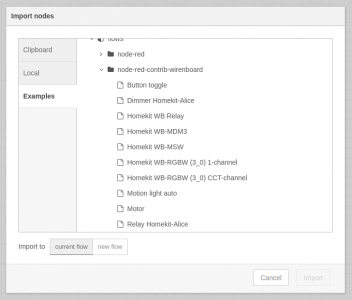
Список примеров
-
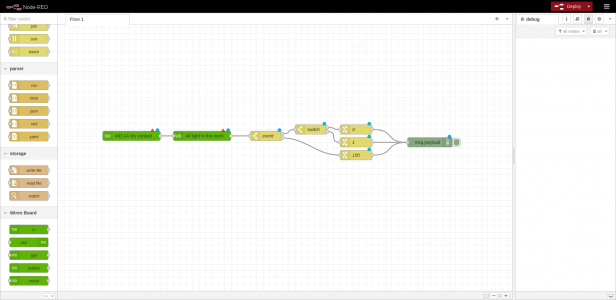
Пример в рабочей области


Использование нод mqtt in и mqtt out для взаимодействия с Wiren Board
Настройка подключения

Альтернативный вариант — использовать ноды mqtt in и  mqtt out. Для этого вам понадобятся адреса топиков, взять их можно в веб-интерфейсе контроллера на странице MQTT-каналы.
Для настройки MQTT-соединения в Node-RED выполните следующие действия:
- Перетащите ноду mqtt in в рабочую область.
- Войдите в конфигурацию ноды и нажмите на Карандаш напротив поля Server.
- На вкладке Connecting задайте адрес брокера и номер порта.
- В поле Name введите любое имя сервера.
- На вкладке Security можно указать Имя пользователя и Пароль для подключения к брокеру. Если в качестве брокера выступает контроллер Wiren Board, это поле нужно оставить пустым.
- После заполнения всех полей нажмите кнопку Update. Созданный брокер теперь можно использовать для настройки всех подключений.
- Выберите созданные брокер из списка в поле Server.
- Введите адрес mqtt-топика в поле Topic.
- Нажмите кнопку Done.
По такому же принципу настраивается нода mqtt out.
- Настройка MQTT-брокера (Server)
-
Вкладка Connecting
-
Вкладка Security


Отправка команд
Для отправки команды контроллеру по MQTT используется нода mqtt out. При этом в поле Topic указывается адрес mqtt-топика контроллера, в который необходимо записать параметр. Нужно учитывать, что в конце адреса ноды mqtt out нужно написать /on, иначе параметр в топик не запишется. Например, /devices/wb-mrgbw-d-fw3_129/controls/RGB Strip/on. Подробнее читайте на странице MQTT.
- Настройка нод для работы с MQTT
-
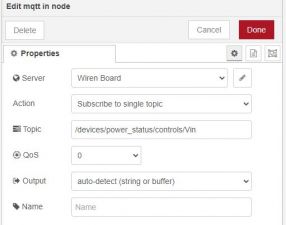
Пример настройки ноды mqtt in
-
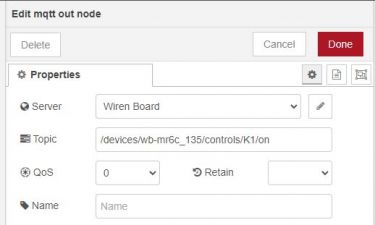
Пример настройки ноды mqtt out
-
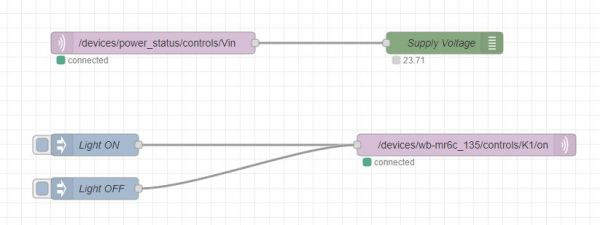
Обмен данными через MQTT в Node-Red


Для отправки параметра в ноду mqtt out можно использовать ноду inject.
- Перетащите ноду inject в рабочую область.
- Подключите ее ко входу ноды mqtt out.
- Зайдите в настройки ноды inject и задайте Имя ноды, Тип переменной и ее Значение. Нажмите кнопку Done.
-
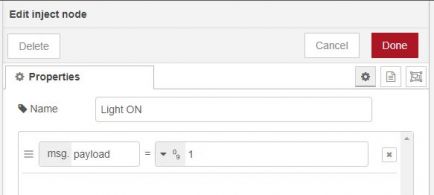
Пример настроек ноды inject для управления дискретным параметром
-
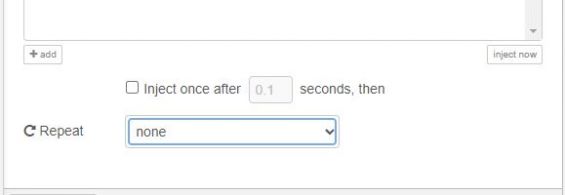
Поле настройки периодов повторения отправки ноды inject


-

Пример использования ноды inject

После настройки ввода и вывода можно обрабатывать данные внутри Node-RED и настроить использование сторонних сервисов, например, Умный дом с Алисой.
-

Пример управления с помощью Алисы

Примеры использования
Примеры использования Node-RED с WB-Nodes на контроллерах Wiren Board: